Tag Archives: Windows 8

Setting Default Programs

Finally, we’re talking about setting default programs. Thanks for being so patient.

Every computer application has a designated program that opens it. Most of these are set to a default when you load or download the program.


What’s a computer application? A computer application is software that lets you perform a basic task (or sometimes not so basic).

Examples of computer applications are word processors, spread sheets, music players, PC e-book readers, calendars, even your web browser.


Setting Browser Defaults:

You’ve probably gotten a message at some time in your computing life like this:
default browser check

No, you won’t have pretty pink boxes. They’re where your browser name will appear.

We get this message because when we download/load new programs many times we also download commands to change our current default settings. We usually don’t know we’ve done this. Annoying, yes; malicious virus-ware, no.


FYI: your default browser (Firefox, Chrome, Internet Explorer, etc.) is different from your default search engine. For example, my browser is Firefox, but Google is my default search engine.


You want to reset your browser default? Great. Here’s how.

1) At the top-right of your browser window, click the menu bars  menu bars   in Chrome or Firefox, or the tools icon gear iconin Internet Explorer.

2) Select Options/Internet Options/Settings depending on your browser choice.

Here’s what you’ll see:

Firefox:

Under the General tab at the very top is where you make changes in Firefox. Click OK when you’re done.
Firefox default check


And no, I didn’t realize Firefox was not my default browser. That’s just how fast other programs can change your settings.

Chrome:

Chrome’s default browser update is at the very bottom of the Settings page.
Chrome browser default


Internet Explorer:

Internet Explorer’s default settings are located under the Programs tab in Internet Options.
IE default browser set


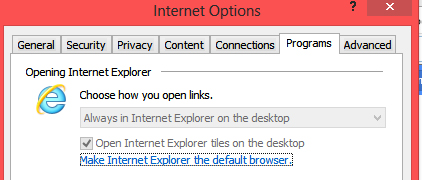
3) If your browser isn’t your default browser, click where it says Make this my default.

You’re welcome to check the box in front of Always check to see…, but the notifications can get annoying fast. I checked the box and am about ready to uncheck it. I open Firefox when I want to surf the net so it’s my default browser by habit.


Now that we’ve warmed up on setting our default browser, we’ll advance to setting programs for your applications.

Setting Default Applications

Every application has a set default inside your OS.

FYI: Remember what an OS is? No? Check out last week’s blog: Finding and Setting Browser Downloads

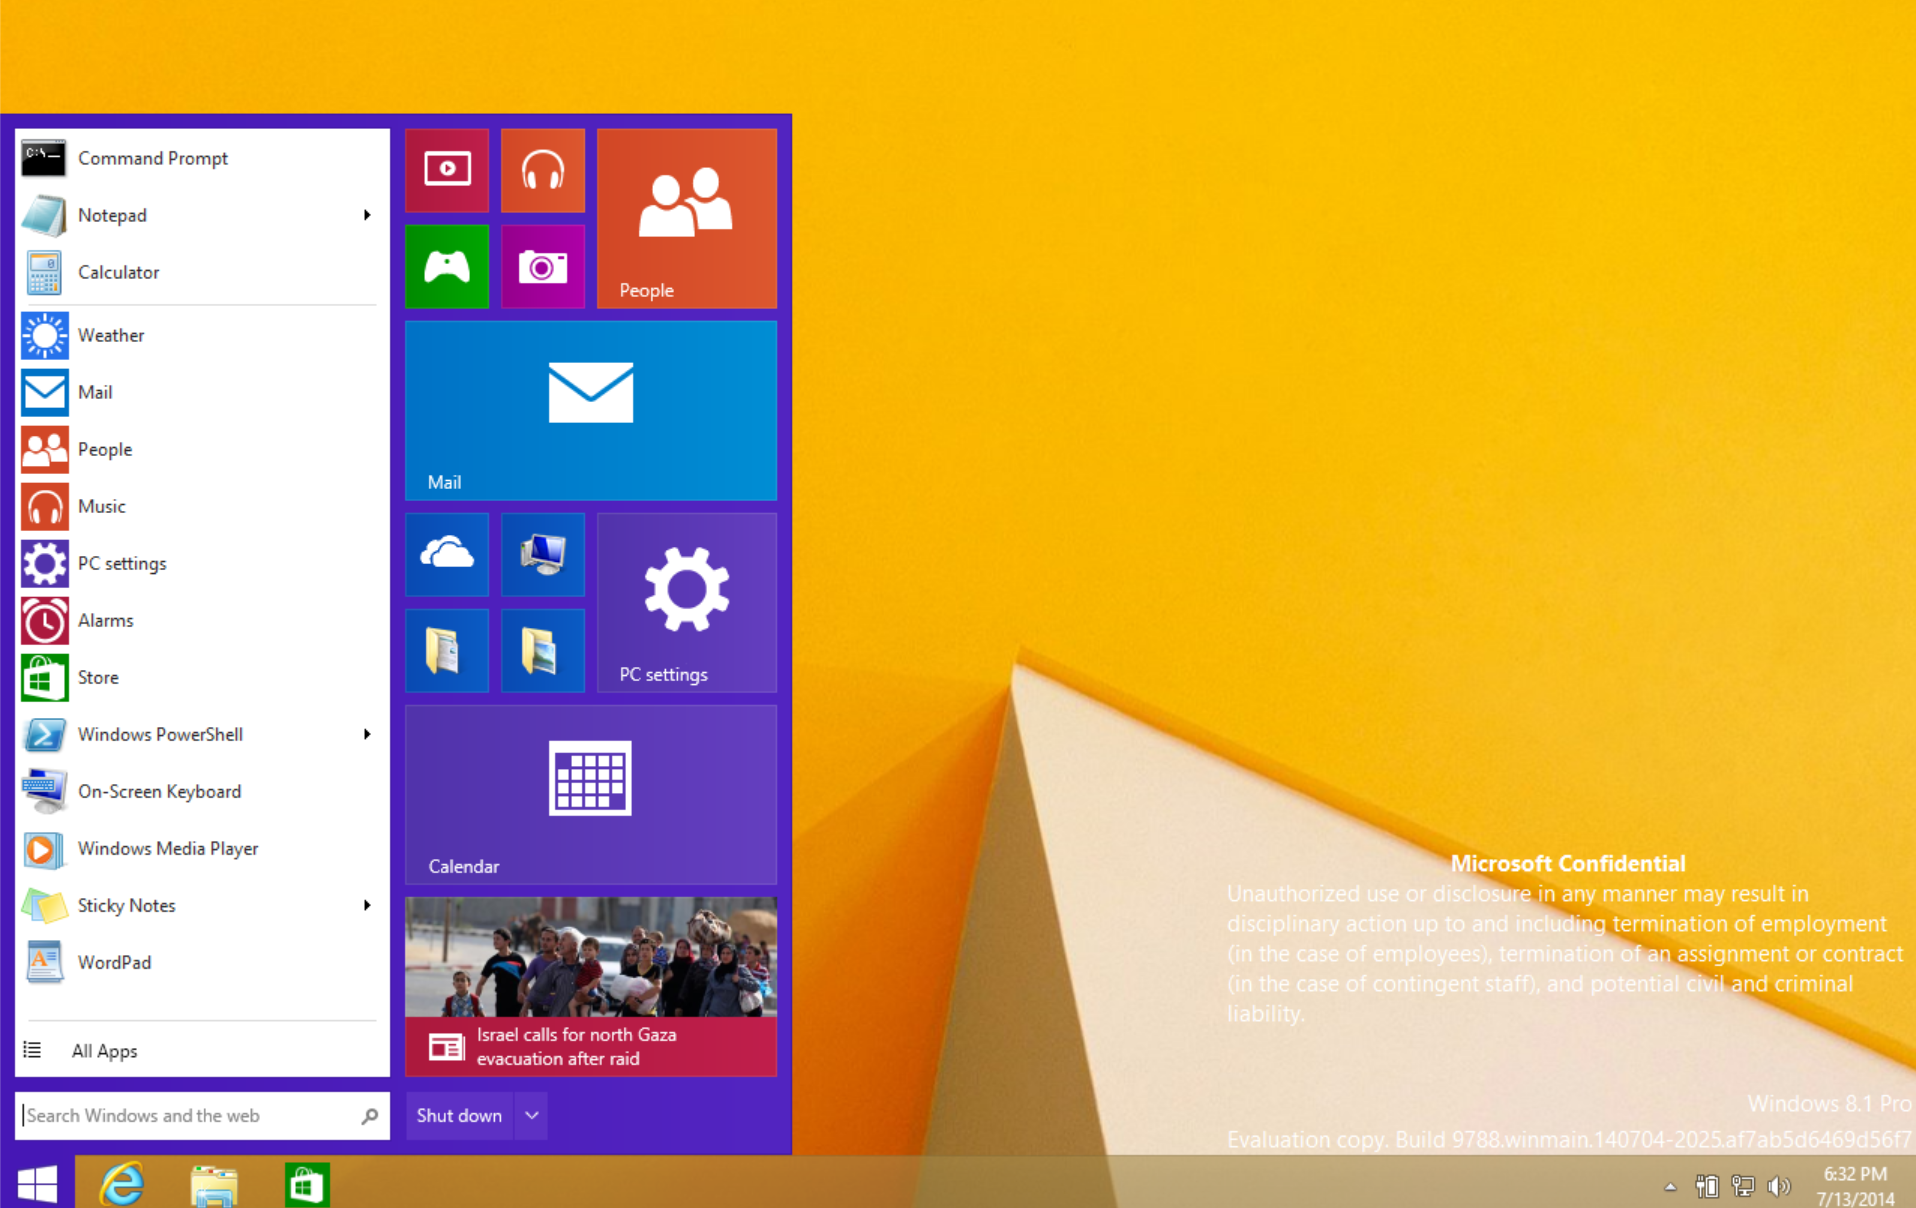
In Windows 7 or 8, you’ll find your Default Program directory within your Control Panel.

FYI: Access your Control Panel from the Start menu in the lower-left corner of Windows 7, or by hovering over the top or bottom right of the Windows 8 screen to enable the Charms Bar, then choose Settings.

TIP: If you don’t like the new fangled look of the Control Panel, you can go back to the trusty alphabetically ordered list by changing the View by: details. I have mine set to Large icons.

In the Control Panel, click Default Programs.Control panel- default programs


Just look at all the choices you have to change default programs in your Windows OS. Remember, I have Windows 8 so your screen may look a bit different if you’re running Windows 7 or earlier.
default program screen

Here, you can not only set your default programs, but you can change associated file types, and set computer defaults. Go ahead. Open any one of these to look around.

Oh. You’re scared to? It’s okay. I’ll give you a tour first.

This is what you get when you click on Set your default programs.
Set your default Programs screen


If I click on a program listed, I’m shown the current defaults. Let’s use Paint as an example.

When I click Paint, I see this.
Paint default settings program screen

Notice under Paint’s description box it says “This program has 4 out of 14 defaults”?

If I want to know which defaults Paint is set to, I click Choose defaults for this program. This screen actually tells me how the other 10 defaults are set.
Paint Choose defaults


FYI: If I click Set this program as default instead of Choose defaults for this program (under the Set Default Programs window), everything will be reset to Paint as a default. In other words, all those boxes that aren’t checked will be checked.


WhaQuestiont? You looked back and don’t see a word processor program or spread sheet program listed in the Set Default Programs window? You’re right! That’s because they aren’t there.

To find these, we need to go to the list of all file associations. And when I say all, I mean ALL.

Here’s how.

Open (or Cancel back to) our Default Programs screen from the Control Panel.

This one:default program screen

Then click Set program access and computer defaults to find our file extensions or associations.

I’ve scrolled down to my .doc files so you can see they’re set to open with Word, and that’s what I want.
Set file associations


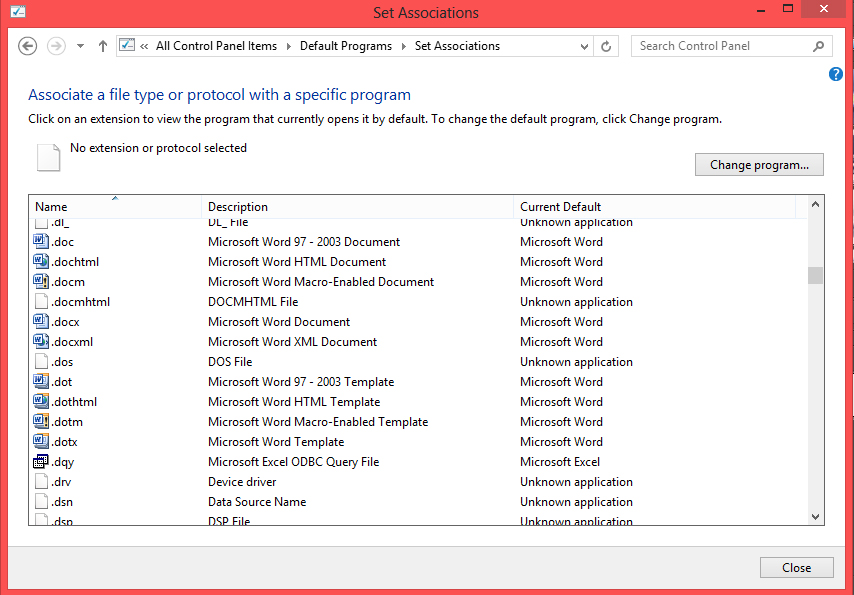
If I wanted to change which program a file extension/association uses to open, I would 1) click the extension to highlight it, 2) click Change program…, 3) Choose the program to set as default, then 4) Close.
Change file association screen


Congratulations! You’ve learned a lot today. How do I know? I can see the words and graphics floating out your ears. Now take a break, grab a cup of tea, and relax. You’re earned it.

Have a super rest of the week, and thanks again for following Patti’s Pathways. 😀


DISCLAIMER: Any and all ideas presented in this blog are solely my own. I experience troubles with technology just like any other person, and if I stumble upon a fix or suggestion I feel could benefit others I pass it along. At no time, have I suggested or implied that I hold any degrees or certificates related to computer repair.

I have during my career assembled parts into working computers; done troubleshooting on hardware and software; utilized a great many computer programs and software; designed and updated websites and blogs; as well as created brochures, banners, and flyers.


Faster Computing: Startup Programs

Since it’s still early in the year, we’re continuing our journey into making your computer run faster, smoother, and just happier in general.

Today we’re talking about the programs that load when you start your computer.sexy cowgirl


 Psst. Computer savvy people. This might bore you. Come back later, but… y’all come back now, ya’ hear?


There are a lot…a lot…of program downloads that stick a command to start their program when your computer boots. Why? Good question.

Many of the programs that start when your computer boots up are unnecessary. You already have designated default programs that open automatically to view photos, listen to music, read manuals, and more. We’ll talk more about setting default programs in another blog.


TERMINOLOGY: Boot, bootup or booting is a fancy word for starting a computer. Reboot means restarting a computer.

Remember when the tech people told you to reboot your computer to boot computercorrect a problem? Restarting a computer behaving badly and not playing nice will reload programs completely as well as the OS’s (Operating Systems like Windows, Linux, Mac OS X, etc.). Many times this fixes any command-line that hasn’t loaded quite right.

Computer programs have thousands of command-lines, and each command-line has to sync with one another for your programs to work perfectly. Sometimes command-lines don’t load correctly. Often this doesn’t cause a problem; a few times it does.

FYI: Don’t confuse a first-time program download and install with a reboot or reload of a program already saved to your computer’s hard drive. Two different creatures.


Why limit programs that load at startup?

Full boots take time because along with starting your OS, your computer usually starts many other programs as well.

Non-operating system programs booting at startup are normally iTunes (just in case you decide to listen to music), Adobe Reader (in case you want to open a program with Reader), Skype (in case someone wants to chat with you), and others. None of these are necessary, but some you definitely want to boot at startup, like your anti-virus and spyware/adware programs. That’s so our computers are protected continuously.

timeEach program booted at startup adds seconds, sometimes many, to your computer’s boot up time. What? You think a few seconds is no big deal. Um, take those seconds times thirty programs. You’re talking about taking minutes off your computing adventure.

Boot time might not be a problem if you remember to turn on your computer before you get that first cup of coffee. But many of us 1) aren’t that organized, or 2) don’t have patience to wait 3-5 minutes for a computer to boot. I fall into category two.


TIP: Computers don’t always need a full boot. That’s why we have “sleep” and “hibernate” options.


Why tweak startup programs?

Many programs tell your computer to run them, or keep them on standby in the background, when your computer starts up. This feature is designed into the commands downloaded with the program.

LagThere’s a couple of reasons you might wish to limit how many programs boot at startup. You already know about the time factor. There’s also added lag in computer response time when programs run in the background.

To stop the programs you don’t really need from starting at bootup, you must manually disable them. Enough idle chat. It’s time to learn.

Setting Your Startup Programs

The place where we adjust startup programs changed in Windows 8. In Windows 7 and before, we use the msconfig command. In Windows 8, we can still use this command, but we get a lovely message along with a link directing us to our Task Manager.

Windows 7 and Before:

1) Type msconfig into your Run area.

You remember the Run area. It looks like this on Windows 7 or before.
You find it by clicking the Start menu icon.Win 7 Run


windows key You can also get to a Run command area by depressing your Windows key + R (for Run). Remember the Windows key?  →

2) The msconfig command opens on the General tab. Click the Startup tab.

Your Startup will look like this except you’ll probably have many more programs. Yes, it could be a mess. This is a clean install of Windows 7.
Win 7 msconfig


Under the Startup Tab, click 3) Disable All. It’s okay, we’re going to re-enable our anti-virus, spyware battlers, etc. next.

Now 4) check the boxes of the programs you want to run at Startup. These should be your anti-virus, ad blockers, and anything you like to have open continuously.

Click 5) Apply, then 6) OK.

In Windows 8:

Go to Task Manager. You can get there from the link at msconfig, or you can depress all these keys at once: Alt+Ctrl+Del.

You think there are other ways to get to where we want to go? You’re right. At least another two or three, but today let’s just use one of the two I mentioned above.

Here’s what my Startup looks like in Windows 8. To change program startup I have two options.

Either 1) highlight the program I’m adjusting, then click the Enable or Disable button on the bottom right,

or

2) Right-click on the program name, then click Enable/Disable in the dropdown menu.

Task Mgr StartUp-Disable or Enable

Notice I leave some programs enabled because I want them available after start up, like Skype and my weather program.


 NOTE: If you don’t know what a command in Startup does, google it. See hkcmd module in mine above? This enable my hotkeys at startup. I use hotkeys so I leave them enabled. I might be able to still use them even if the command was disabled, but I don’t really feel like messing with it. Yes, if I disable something I need, I can simply come back here and re-enable it at any time.


In Windows 8, restarting your computer isn’t needed for the new settings to take effect.

In Windows 7? Honestly, I don’t remember. If you receive a prompt to restart your computer, you can restart it right way, or do what I’d do—wait until I need to shut down for some other reason. The system will remember my changes.

Put the extra minutes you’ve just found to good use. Have a great week, and thanks for following Patti’s Pathways 😀


DISCLAIMER: Any and all ideas presented in this blog are solely my own. I experience troubles with technology just like any other person, and if I stumble upon a fix or suggestion I feel could benefit others I pass it along. At no time, have I suggested or implied that I hold any degrees or certificates related to computer repair.

I have during my career assembled parts into working computers; done troubleshooting on hardware and software; utilized a great many computer programs and software; designed and updated websites and blogs; as well as created brochures, banners, and flyers.


Welcome Windows 10!

October is a nightmare month for me. Terrifying in terms of the number of places to scared girlgo and people to see, not to mention stuffing day-to-day activities into the same time frame.

But guess what? I have more planned at the end of the month, but until then…  I’m baaaack. Cue scary music.


A few weeks ago I informed, notified, warned —pick your poison — of a new Microsoft OS on the horizon. The big announcement came on September 30 as promised, but speculation the new operating system (a.k.a. Threshhold) would be unveiled as Windows 9 was wrong. Microsoft skipped right over the number nine and went straight to double digits.

Welcome To the World Windows 10!

Hello little Windows 10.  We hear you’re a lot less horrifying than Windows 8 (which isn’t anywhere near as petrifying as Windows Vista). We want you to be our friend.

Niceties out of the way, it’s time to dissect our new buddy Windows 10.

With Windows 10 Microsoft has tried to lessen confusion by bringing back the familiarity of Windows 7 while keeping the new interface of Windows 8. Thank you Microsoft development crew.

Windows 10 is probably what Windows 8 should’ve been. Glad to see Microsoft realized the general public wasn’t ready for a futuristic Windows product just quite yet.

A few days ago Microsoft released a test version of Windows 10, and anyone can words only scary microsoftdownload it. But beware.

Windows 10 Technical Preview has numerous bugs, but that’s to be expected. It’s a preview. What wasn’t expected is the depth to which this preview can access your personal information.

“When you acquire, install and use the Program, Microsoft collects information about you, your devices, applications and networks, and your use of those devices, applications and networks. Examples of data we collect include your name, email address, preferences and interests; browsing, search and file history; phone call and SMS data; device configuration and sensor data; and application usage.

For example, when you:

* install the Program, we may collect information about your device and applications and use it for purposes such as determining or improving compatibility,

* use voice input features like speech-to-text, we may collect voice information and use it for purposes such as improving speech processing,

* open a file, we may collect information about the file, the application used to open the file, and how long it takes any use it for purposes such as improving performance, orscreaming woman

* enter text, we may collect typed characters and use them for purposes such as improving autocomplete and spellcheck features.”

Scared spitless yet? You should be.

The good news is other people have downloaded and tested the preview so we don’t have to. Thank you brave computing souls.


What’s new in Windows 10?

Windows 10 has a fresh — not as alien as Windows 8 — look. Some of the icons within Windows 10 look different, but basically function the same as Windows 7.

  • Apps will appear in separate windows.
  • There are dozens of new shortcut key commands. Like “snapping” windows into different corners of your desktop.
  • File Explorer gets smarter in Windows 10. It’ll remember what you recently opened and keep track of your favorite files so you have faster access to the files you use regularly.
  • Taskview will be available so you can see all your open windows along the bottom bar of your desktop.
  • Search includes Internet finds.
  • MS also did some housekeeping, making a few minor changes. Like the ability to cut and paste into the command prompt, which will make intermediate computer users fairly happy.
  • Probably one of the neatest new features is multiple virtual desktops.

What’s that mean? Say I’m working on my blog and have Adobe Photo Shop open, MS Word open, plus a few web windows (WordPress edit, WordPress preview, etc.).

Someone asks me to start a spreadsheet project or to look up something on the internet for them. Before Windows 10, I’d need to add this to my sole desktop mess of open windows. With Windows 10, I can open a new, clean virtual desktop and work there.

With a few mouse clicks or shortcut keys, I can switch between virtual desktops. From what I understand, there is an auto-save function so you can call up your virtual desktops on any device at any time.

NOTE OF CAUTION: When you’re 100% through with a project on a virtual desktop, close/erase the desktop. I foresee people unfamiliar with these eventually having 30 or more virtual desktops open and wondering why their computer performance is suffering.


Okay, now to address the big question for us casual gamers: does Windows 10 have OpenGL?

Windows 10 description says it ships with DirectX12. I have a feeling as with Windows 8, there’ll be no OpenGL on Windows 10.

But fear not! The Grim Reaper hasn’t come for us yet.Grim reaper

At least for Minecraft junkies, there’s a silver lining. Sorry Angry Bird fans, you’ll have to tweak OpenGL as detailed in my first post. See below for the link.

For Minecraft fanatics, the great news is that Microsoft recently purchased Minecraft from Mojang. There’s little doubt Microsoft will fix the Minecraft issues to run with its Operating Systems. It would be counterproductive for them to leave their game unplayable on their OS… I hope.

I’ll update the OpenGL info soon after Windows 10 is released.


Whether you run a 4″ mobile device or an 80″ LED screen, you can use Windows 10. Keep your eyes and ears open. Rollout should start spring of 2015.

Have a great week, and thanks for following Patti’s Pathways. 😀


Related Blogs: On the Threshold of Windows 9, A Notch in the Belt of Microsoft, Finally a Fix for Windows 8 OpenGL Error


All images used within EULA parameters granted by Microsoft.


DISCLAIMER: Any and all ideas presented in this blog are solely my own unless otherwise noted. I experience troubles with technology just like any other person, and if I stumble upon a fix or suggestion I feel could benefit others I pass it along. At no time, have I suggested or implied that I hold any degrees or certificates related to computer repair.

I have during my career assembled parts into working computers; done troubleshooting on hardware and software; utilized a great many computer programs and software; designed and updated websites and blogs; as well as created brochures, banners, and flyers.

A Notch in the Belt of Microsoft

Yep, another special midweek edition. This one isn’t about flash fiction — although some gamers may hope this is fiction, but it’s not — it’s about the biggest gaming news in years. That’s my opinion, but prove me wrong. Can’t, can ya’?

microsoft logo roundThe major gaming announcement this week is that the Microsoft Corporation has purchased Mojang AB (owner of the popular Minecraft video game) for $2.5 billion USD. That’s billion… with a B. I know what you’re thinking: But Patti, in the 2014 fiscal year Microsoft Corporation’s net profit was 22.07 billion USD; they can afford it.

You’ve convinced me. They can afford it, and it might just be the best money they’ve spent lately. Why?

Avatar_Creeper_100x100Markus Persson (aka Notch to the gaming world), Swedish programmer and kingpin of Minecraft, has been a thorn in Microsoft’s side of late. First, with his anti-Windows 8 stance. Remember, he refused to update Minecraft to work without OpenGL? Trust me, he did. That’s how this blog got started. See my first post Finally a Fix for Windows 8 OpenGL Error.

Persson also stated there was no pressing reason to create a Minecraft version for Microsoft’s Windows phones. Minecraft is one of iPhone and Android’s most popular mobile apps, and those two operating systems have a 95% share of the world mobile market according to Business Insider. Microsoft Windows phones are barely a speck on the smartphone horizon. Could there be a correlation? Possibly. But I do see a trend Microsoft could well want to take a Notch out of.

Well, Mr. Persson, tick off a gigantic corporation and watch their thinktank wheels turn. They usually will come up with an offer you can’t refuse. And you didn’t. Why sell your baby to a company you obviously despise?

Since its launch in 2009, Minecraft has sold over 50 million copies for PC’s, smartphones, and video game consoles. Its annual revenue last year was $290 million. While that’s small potatoes for Microsoft, it’s sizable for a company like Mojang AB.

Minecraft is taking off like wild-fire. There are Minecraft-themed camps, Halloween costumes, Scholastic gaming guides, Lego characters, and a soon-to-be Warner Bros. movie. Don’t forget the online Minecraft projects, YouTube and Twitch tips and tricks posts, and teachers using it to educate students in computer programming classes. Oh, and Minecraft is one of the most played Xbox games in the world.

Its popularity is the core of the problem. Persson can’t keep up. He’s frustrated managing something so large, plus he’s having difficulty keeping development pace with demanding Minecraft fans.

giant babyIn essence, Persson’s baby has grown too big for him to care for. His best course of action is to find someone with experience to nurture it and see to its future.

But before we get too sentimental, don’t forget he had 2.5 billion reasons to entrust the baby’s care to Microsoft.

Persson posted on his personal website: “Thank you for turning ‘Minecraft’ into what it has become, but there are too many of you, and I can’t be responsible for something this big.”

Serious gamers are grumbling a corporate takeover will ruin Minecraft’s homegrown, Indie flavor. But honestly, I saw this coming when Walmart started selling Minecraft plushies. That was the beginning of the end for the Indie marketing strategy.

What’s my opinion and thoughts for Minecraft’s future?

Personally, I think this could be a very good thing for Minecraft fans. A friend mentioned his hopes of Microsoft stabilizing Minecraft’s online servers. I hadn’t even thought about that.

Things I had thought about were new game content, and more rapid implementation of suggested improvements. I’d also thought about corporate greed. Will Microsoft decide to offer added Minecraft features and content for money? Currently, you buy Minecraft — $7 to $27 USD depending on the platform for play — and everything is included; all updates are free.

Nobody really know how this scenario will play out, but let’s pray there are relatively few growing pains.

Have a great rest of the week, and thanks again for stopping by Patti’s Pathways. 😀


DISCLAIMER: Any and all ideas presented in this blog are solely my own unless otherwise noted. I experience troubles with technology just like any other person, and if I stumble upon a fix or suggestion I feel could benefit others I pass it along. At no time, have I suggested or implied that I hold any degrees or certificates related to computer repair.

I have during my career assembled parts into working computers; done troubleshooting on hardware and software; utilized a great many computer programs and software; designed and updated websites and blogs; as well as created brochures, banners, and flyers.

Password Protecting Folders In Windows 8

This post was originally going to be “How to Permission Protect Your Windows 8 Folders” because chatter on the web said there is no way to password-protect folders in Windows 8.

dancer, german femaleSurprise! You can password protect folders in Windows 8. You do this by using a zip program and archiving your special folder. After doing a bunch of dancing around, you’ll get password protected folders and files.

Be forewarned. The choreography sounds complicated, but you’re a good dancer so I think you can follow.

Now… get ready to dance. I’m leading.

Dance Step One:

Create a Restore Point.

In Windows 8 and 8.1 to create a restore point go to Control Panel > Recovery > Configure System Restore. Don’t forget there’s always an uninstall option at Control Panel > Programs if you don’t like a program.

Dance Step Two:

Find a good file archive program. I have WinZip, but the free archiver I tested for my faithful readers is 7-Zip.

What’s a file archive program? A file archiver either 1) compresses information to take up less hard drive or download space, or 2) makes files and folders easier to send between people since they are archived with file content and not a specific file system.


MORE THAN YOU EVER WANTED TO KNOW ABOUT FILE SYSTEMS: Different digital devices use different file systems to store data. Flash drive content is stored differently than CDs/DVDs. Different operating systems also have different file system types. Microsoft/Windows file system (usually FAT or NTFS) is different from the Macintosh/Apple file system (HFS). For the pre-computer crowd, think Dewey Decimal System versus strict alphabetical order.Rumba

Now to toss a watusi step into a rumba dance to confuse you further. File systems are not the same as file extensions (.exe, .doc, .jpg, .zip, .bat, .epub).


Why did I choose 7-Zip to test? Out of 5 stars, it still has a 4- to 4 1/2-star approval rating from users after 8 million downloads at cnet.com. Cnet editors gave the 32-bit a 5-star rating, but didn’t rerate the 64-bit program. I’m using 64-bit with no troubles.

Psst! If you’ve been following this blog, you’ve figured out my favorite program download site is cnet (download.com). I’ve used it for years and have never gotten a virus, plus little or no adware sneaks in with your downloads.

HEADS UP: On download.com — and a lot of other download sites — don’t be confused by paid advertisers on the same page as program downloads. Paid advertiser download buttons are in a box usually with the name of the paid program beside the button.Download 7-zip

In the above example, the top free download is RegClean Pro. The name’s fairly well hidden, but you can find it if you try. The second impersonator for our download is Bitdefender. I’m sure it’s a very nice program, but we don’t want it today. We want 7-Zip.


7-Zip
http://download.cnet.com/7-Zip/3000-2250_4-10045185.html

7-Zip 64-bit
http://download.cnet.com/7-Zip-64-bit/3000-2250_4-10905593.html

After downloading 7-Zip, follow the prompts to install.

Oh good, the band is back to playing our waltz.

How To Password Protect Items in Windows 8

1) Find the folder you wish to password protect.

For demonstration purposes, I made a TEST Test Folderfolder on my desktop. I’d suggest you do the same until you are familiar with how this works. Toss a test.doc or two into your TEST folder. You’ll need something to protect or it doesn’t work. At least, it didn’t for me.

Note on Photos and Clipart: .jpg, .gif, .png, and others save in zip archives, but don’t open. Some premium archiver programs have an image viewer capability. If you don’t have one of those, you can unzip/move the photo to a regular unarchived file/folder to view.

2) Right-click your TEST folder, 3) choose 7-Zip, then 4) Add to archive…7-zip

5) Make sure the Archive Format is zip, and the Encryption method is ZipCrypto. This allows someone you’ve given the password to the ability to open this file with any zip program. 6) Enter a password of 8 digits, and 7) Press OK.
Add to archives

8)  Locate the .zip folder you’ve just created.

The easiest way is clicking the Taskbarfolder icon on your task bar, then under Desktop find your TEST folder. You can also use Windows key + X, and search for your .zip folder with the File Explorer.

Your original TEST folder is still there. That’s the one you made first, but not the archived one. To find the archived one, scroll down a little farther. If you see a TEST.7z folder, you archived your folder in 7-Zip format.Test

Did you notice my archived folders show as WinZip files? That’s because WinZip is my default archive program.  My new password protected files open in WinZip also.

9) Left-click on your TEST.zip folder and you’ll get a prompt to enter a password. That’s the password you just assigned in 7-Zip: Add to Archive. 10) Enter your password.
Password

10) Choose the document in the folder you wish to open/edit. Now you’re free to edit the item as you wish.

FYI: If you don’t close the archived folder, you shouldn’t need to reenter the password to access other documents in that folder.

A WORD ON SAVING YOUR FOLDER:

When you exit your new .zip folder, 7-Zip is so nice, it’ll ask if you want to update it. You do.
7-zip save

WINZIP NOTE: If you’re default program is WinZip, you’ll get this save screen.
SaveYou want the top option. WinZip now asks for another password. It must think an updated document needs an updated password. I use the original pass I set. If you don’t edit the file, WinZip doesn’t ask to update the password.

There. You’re done! You’ve created a new password protected .zip folder, and you’re free to delete your original folder.

I played around for a while before actually deleting any folders. My password protected folders are still working. All seems right in the .zip computing world.


Are there any downsides?

The only downside I see is adding items to your protected .zip folder.

Creating new folders in either 7-Zip or WinZip is easy. Right-click in the protected folder body (or chose the File command at the top bar), then left-click “New Folder” or “Create Folder”.

The tricky step is adding documents or photos within a protected folder in 7-Zip.

Archive programs are made to conserve space or make data more portable, not as a place to create documents, view photos, et cetera.

7-Zip:

Let’s talk about adding items in 7-Zip first.

I will requote the old adage: You get what you pay for. This free program makes it necessary to dance around again to add items.

7-Zip does have a “Create File” option, but for some reason, it doesn’t work for me nor can I find anyone on the forums who succeeded with it. Let me know if it works for you.

To add photos or documents using 7-Zip, they need to be 1) archived first (a new .zip made), then 2) dragged and dropped into your password protected archived folder. Cut and paste aren’t supported.

It might be of greater benefit in 7-Zip to resave old items from your protected folder in a new regular folder with the new items you want to password protect, then rearchive them all.waltz

Why? Each added item equals a new folder. Soon, if you have a lot of super secret stuff, you’ll have oodles of folders to waltz through to find the one you want.

WINZIP:

Adding photos or documents using WinZip is much easier.  1) Create and save your item as usual. 2) Drag and drop it into your password protected Winzip folder. 3) With the document name highlighted, 4) open Tools, and 5) choose Encrypt Zip File.

When it asks a password, continue with the steps you used before to edit and save it. When you close your newly added file, WinZip will password protect it.


I know this is a lot to process, but if you wish to password protect your data in Windows 8, you must learn the tough routines. And pray Windows 9 allows password protecting files again then upgrade.

You should pat yourself on the back though. hula bear and penguinYou’re a great dance partner. Now sit this next set out and put your feet up, you’ve worked hard.

Have a productive week, and thanks again for following Patti’s Pathways. 😀


Other posts that compliment this one:

Creating the Safest Passwords

On The Threshhold of Windows 9


DISCLAIMER: Any and all ideas presented in this blog are solely my own unless otherwise noted. I experience troubles with technology just like any other person, and if I stumble upon a fix or suggestion I feel could benefit others I pass it along. At no time, have I suggested or implied that I hold any degrees or certificates related to computer repair.

I have during my career assembled parts into working computers; done troubleshooting on hardware and software; utilized a great many computer programs and software; designed and updated websites and blogs; as well as created brochures, banners, and flyers.


On the Threshhold of Windows 9

Toward the end of September — September 30 to be exact — I’ll be spying on computer world news. Spy with newspaper

Intelligence reports mark this date as a likely press event to unveil Windows 9 (code-name: Threshhold).

In April 2014, attendees at the Build conference were treated to a sneak peek of Threshhold. Rollout date is currently set for April 2015.

Why the hurry? Windows 8 just debuted. Therein lies the problem.

Windows 8 has received a less than stellar reputation. For the general computing public, Windows 8 is too heavy on apps and too light on desktop functionality. Honestly, I like Windows 8 —  my previous OS was Vista, the OS that almost single-handedly brought down the free world. I’ve also not upgraded to 8.1 because of a number of sketchy reviews from people who did.

I’m praying Microsoft’s trend of great OS – poor OS – great OS – poor OS continues making Windows 9 the next XP or 7. Sometimes I wonder if Microsoft releases bad OS’s on purpose so the good ones look phenomenal by comparison. I know, I know. What happened to my glass-half-full mentality? It’s still here, just undercover. 😉


On the Threshhold of Windows 9

I’ve tracked down a few new features of Windows 9. Beware, nothing is one hundred percent set in concrete gumshoes.

Changes/features may or may not be universal across desktops, laptops, and tablets (we hope not); and Microsoft could tweak anything to insure the best performance for each specific hardware device (we hope so).

NEW WINDOWS 9 FEATURES:

    • Start menu is back, just when we Windows 8 users figured out how to live without it. It’s probably like a bicycle: once you can learn, you never forget.
    • This is a leaked printscreen of the new Start menu.Windows_9_Start_Menu_Neowin


  • Removal of the Charms bar.side commands

Remember the Windows 8 bar that opens when you hover over the right top or bottom of your desktop? Yep, that’s the Charms bar. Honestly, it’s more of an Apple-wanna-be bar. It’s not coming back. At least not in Windows 9.

  • Metro apps are still a part of Windows 9, but in  a much lesser capacity… or so it’s said. Some of the leaked screenshots make me wonder about the reliability of the operatives. They’re reporting Window 9 Apps will open in small desktop windows.

What’s a metro app?  It’s all those little box programs that show up on the Windows 8 Start Screen, including the ones you added from the App Store.  Metro apps are fantastic if you have a touch screen tablet, but — as everyone found out with Windows 8 — not very user-friendly for keyboard computers.

  • Greater ability to personalize.Windows-9 Personalize


  •  Cortana — Microsoft’s voice-based assistant currently available on Windows Phone only — could be part of Windows 9.

Don’t panic. You’ll probably be given the choice to turn her off and on. And guys? Enjoy it. You may never get a chance to silence a woman this easily again.

  • Possibility the new Windows OS will be subscription-based.

Rumors are flying about the price. Software watchers vary in opinion of the cost from Windows 9 being free or negligible to subscription-based. Remember Office 365 priced at $100? It’s a subscription-based MS program. You get to use it for 365 days. When your subscriptions runs out — you guessed it — you have to pay again. Personally $100 annually for an upgrade is way to expensive for my taste. If Microsoft charges a subscription fee anywhere close to Office 365, and Windows 9 doesn’t perform up to expectations, this could start the next Cold War with OS defections inevitable.

I’ll leave you with a few more leaked screenshots of Windows 9. Enjoy.

Thanks again for following Patti’s Pathways. 😀


Windows 9 Desktop:
Windows-9-Design-Mixes-the-Desktop-and-the-Modern-UI-Screenshot-385249-2


Outlook:
Outlook-Windows-9


DISCLAIMER: Any and all ideas presented in this blog are solely my own unless otherwise noted. I experience troubles with technology just like any other person, and if I stumble upon a fix or suggestion I feel could benefit others I pass it along. At no time, have I suggested or implied that I hold any degrees or certificates related to computer repair.

I have during my career assembled parts into working computers; done troubleshooting on hardware and software; utilized a great many computer programs and software; designed and updated websites and blogs; as well as created brochures, banners, and flyers.

Scanning Without Extra Program Downloads

Welcome to a blog for the everyday techie. Although, there are times intermediate to advanced users can benefit (i.e. Finally, A Fix for Windows 8 OpenGL Error).Printer

Today, we’re talking specifically about scanning or printing without the extra software supplied with your hardware.

Why? Less miscellaneous computer programs means less clutter which increases efficiency, not to mention lessens lag and frees up computer memory. Windows operating systems have a plethora of drivers and functions that make those additional programs unnecessary.

But the big reason I avoid installing pre-packaged software is there are stealth (a.k.a. sneaky backdoor) programs that install with your new hardware drivers. Yep, they’re on digital downloads, but also on the disks included. We’ll cover those another week: Spotting Pesky Add-on Programs You’ll Never Need.

Today’s hint works for printers/scanners, cameras, or any usable device that shows up in your Windows Control Panel.


How to Scan Using Only Windows

I have a HP printer/scanner/fax machine. Yes, it’s ancient, but it still works so I keep it around. Since I don’t want to deal with the tag-along programs (technical terms are “crapware” or “junkware”. I’m not kidding), I initiate it through Windows.

If there are features you want beyond barebones — ink levels come to mind — you’ll need to download the program that comes with the hardware. We’ll cover how to choose the features you need vs. the extra garbage in another blog.

NOTE: I use Windows 8 so finding Devices and Printers through Control Panel may be a bit different for you if you use Windows 7 — the last good Windows Operating System (OS). There is a new Windows OS on the horizon. I’ll tell you about that next week. 🙂


1) Plug the printer USB into the computer if it’s not already. Turn on the printer.

Windows now recognizes there’s a device attached… we hope.

2) Open Control Panel.

I use the Windows key + X.
windows-keysmall


In Windows 8, the Windows key + X gives me this:
Control Panel

 -OR-

You can also access the Control Panel from the Settings menu (hover over the top/bottom right corners of your screen). Click Settings at the bottom.
Setttings Shortened


-OR-

You can access it by typing “control panel” in the application search area. Hover over top/bottom right of your screen, click Search and type in your request.
Control Panel-App

FYI: In Windows 7, you can simply open your Start menu and in the right column is your Control Panel.

Where were we? Oh yes, initializing your printer/scanner without installing the included programs.

3) In Control Panel, click Devices and Printers.Devices and Printers


4) Scroll down. Your printer icons are at the bottom (Arrow 1). The printer with the green check below is your default printer.
Devices and Printers with arrows.

What’s Arrow 2? Arrow 2 is where other devices, like cameras, show up. If you don’t find the device you are looking for there, you can Add a Device (Box 3).

FYI: The squiggly lines in the middle is the area any device allowed on your home network shows up. I have twelve or so listed, even people who visit four times a year show up. Yes, the inactive ones can be hidden, but one must jump through hoops and mess with the computer registry. I Just scroll past them. If they really bother you, search “Hide Inactive Multimedia Devices” on the internet for instructions. After reading the instructions, I’m fairly confident you’ll scroll past the multimedia icons also.

5) Click the printer you’re using for the project/letter/whatever you’re scanning.

6) When the next window opens, choose Scan a Document or Picture.
scanner


7)
The New Scan window opens.

Here’s where you create different profiles for items you’d like to scan. Notice mine. I have Photo which is higher resolution in color and Documents with less resolution in grayscale. scanner profiles


You can also choose Manage Scan Profiles from the Printer/Scanner window. You’ll get a different looking window, but with the same editing options as the New Scan window.scan profile


A third way to access Scanner Profile is by right clicking on your printer icon under Devices and Printers (see below). Ninth option down on the menu is Scan Profiles. NOTE: Right above Scanner Profile is a Start Scan command. Yep, you can use that to take you to the New Scan window.Right Click on Printer


Bingo! You are a scanning-without-any-added-programs pro.Thumbs up

What? You don’t feel like a scanner pro?

There’s a lot of information here. Grab a cup of tea, check your tweets or Facebook, and come back later to reread this huge amount of material.

Remember some of these steps are duplicates. Simply different routes to get the same result. Pick the one you like best and is easiest for you to remember.

 ADDED TIP:

I’ve got a secret to show you. How to change the default folder where your pictures/documents/music land.

1) Go to your Libraries folder. I access mine through the file folder icon on the quick launch bar at the bottom of my Desktop.

Alternate ways to get to your Libraries folder: Windows key+X > File Explorer -OR- Windows key+E.

Psst1
2) Right click on any of the Libraries folder icons to access Properties. We’re talking about photos so we’ll use Pictures for our example, but you can change where to store your documents, music, or videos also.
LIbraries


3) 
Select Add, then select the folder you wish to store your photos in.Picture Properties

Your chosen folder will now show up in the Picture Properties menu. I have a folder I send pictures to then move within my photo folders (e.g. Holidays, Family, Cartoons, etc.)

4) Click the new folder added, then 5) Apply, and 6) Set Save Location (middle left).Set Save Location


FYI: See the P:\Photos folder? P is for Patti, and I’ve partitioned my harddrive so I can save documents and photos to a location that won’t get reformatted if Windows takes a dive and I have to reinstall. That’s my safety partition until I find time to save my files to an external harddrive or flashdrive.

What? You want to know how to partition your harddrive. That’s another blog. 🙂


If you followed the steps above, you’re done changing where your pictures will save from your devices. Neat trick, huh?

Well, have a super day and happy scanning! And, thanks for visiting Patti’s Pathways. 😀


DISCLAIMER: Any and all ideas presented in this blog are solely my own unless otherwise noted. I experience troubles with technology just like any other person, and if I stumble upon a fix or suggestion I feel could benefit others I pass it along. At no time, have I suggested or implied that I hold any degrees or certificates related to computer repair.

I have during my career assembled parts into working computers; done troubleshooting on hardware and software; utilized a great many computer programs and software; designed and updated websites and blogs; as well as created brochures, banners, and flyers.

Windows 8: Administrator Accounts

If you are fairly computer literate like me—I know enough to be dangerous—at times you’ve found yourself wanting to move something, run something, delete something, and Windows tells you “You do not have permission to do this”. You think, “Huh? It says I’m an administrator.” So why then is Windows putting the kabosh on any changes you wish to make?

Here’s why you get that nasty, heartless message. There are two kinds of administator accounts in Windows.

Administrator User: an unelevated  administrative account created by default. This gives administrative rights to access your computer completely and make certain changes. As an Administrative User you are allowed to “Run as Adminstrator” any elevated program or make changes that affect every user.

Built-In Administrator: a hidden elevated  administrative account with unrestricted access rights and permissions.

See the difference?
Administrator User allows you to mess with your computer a bit.
Built-In Administrator lets you mess up your computer completely beyond recognition.

Insert appropriate warning here to back up computer files before making any changes.


OTHER USEFUL WARNINGS: 1) Always leave at least one account set as an Administrator User or you’ll be locked out of making changes to your computer, and if that happens you are on your own :-p 2) If you enable Build-in administrator, create a password to protect it.


Today, we’re talking about Built-In Administrator for Windows 8 specifically.

A lot of changes can be made with your regular “unelevated” Administrator account, but if you find that you just can’t by-pass Windows security to make changes, you’ll need to enable the super secret, not-to-be-named “Built-In Administrator” account.

Some things to know about the Built-In Administrator account: 1) Its folder won’t show up until after it is first used, 2) Apps cannot be downloaded with the Built-In Administrator, 3) This account should only be used to make program/folder changes and NOT as a regular user account, 4) Because of number 3, log off of the Built-in Administrator as soon as you are done using it.

There are several ways to activate the Built-In Administrator, I’ll show you the easiest way because the rest are really only for tech support guys who like to mess around and have too much time on their hands.  (#.#)

How to Activate Built-In Administrator:

1) Owindows-keypen your command prompt by holding down the Windows key  and pressing “X”.


This opens in the bottom left-hand corner:

Windows+X

2) Click Command Prompt (Admin)

3) Type in:  net user administrator /active:yes

After you enter, you’ll have this.

command prompt-admin

NOTE: There are cautions around the web forums to disable Built-In Administrator when you are done using it. If you log off each time, I’m not sure that’s necessary. It’s your call. TO DISABLE: use the same command line, but change the ‘yes’ to ‘no’.

4) Now you can log off and see your new Built-In Admin account.

What? You don’t know how to log off Windows 8. Neither did I so chill, it’s easy.

side commands


A) Hover over the top or bottom right corner of your screen until you see this handy menu. B) Click “Start” in the middle. C) Click on your picture in the top right corner, and Voila! You are in control of Windows 8 once more. D) Click Sign Out.

Windows 8 will force the shut down of open programs—it’s nice and will ask if that’s okay first, but you have very little time to decide so don’t lolly-gag.


You should now see this screen after a few minutes (if you get the Pre-screen—not the technical term for it—just click on it to be rid of it).

Admin logon

There’s your Built-In Administrator on the left. 5) Click on it and enter.

The first time you, enter you’ll get mini-Windows 8 tour complete with elevator music (I’m teasing about the music. Honestly, I don’t know…I had my sound muted.)

Now you are free to mess up your computer at will!

In all seriousness, be careful what you do on this account as things done in error can adversely affect how your computer works and even IF it works.

side commands


To add a password to protect your new super secret Built-In Administrator account: A) Hover over the top or bottom right corner. On your handy dandy side menu, B) click Settings at the very bottom.


Setttings


C) Click Change PC Settings at the bottom of Settings.


Now D) click Users and E) Change/Add your Passwordchange password

IMPORTANT TIP: If you’re like me and tend to forget passwords or write them down wrong/forget to update them in your Word.doc table, there is a very useful tool you should utilize. While logged into your Built-In Administrator acccount under Control Panel (Windows key + X) > User Accounts > click Built-In Administrator > in the left margin “Create password reset disk”. A flashdrive is all you need.

Good luck, and thanks for following Patti’s Pathways.:-D


DISCLAIMER: Any and all ideas presented in this blog are solely my own unless otherwise noted. I experience troubles with technology just like any other person, and if I stumble upon a fix or suggestion I feel could benefit others I pass it along. At no time, have I suggested or implied that I hold any degrees or certificates related to computer repair.

I have during my career assembled parts into working computers; done troubleshooting on hardware and software; utilized a great many computer programs and software; designed and updated websites and blogs; as well as created brochures, banners, and flyers.

Finally, A Fix for Windows 10 (8 and 8.1) OpenGL Error

UPDATE!  Visit my new blog to find an easy fix when Windows 10 automatically updates your newly tweaked graphics driver. When Windows Auto Updates Your Graphics Driver.


This Fix for the OpenGL Error post is now easier to use. I’ve moved the driver tweak for Windows 10 to the top, but kept the original post for Windows 8 and 8.1 toward the bottom in case anyone still needs it.

alligator thumbs upI’ve also moved my awesome reader discoveries into the section they reference. If you have questions, read the massive comment section because someone has probably answered your question there. I totally love my readers!

Happy Gaming!


Back in 2012, I looked for options and ideas for a year — yep, an entire year — to resolve the OpenGL driver issues with the Windows 8 update. Windows 8 evolved into 8.1 and finally — thank goodness — was replaced by Windows 10. And since Windows 10 still did not include the OpenGL driver information, my blog is still as popular as ever.

I have Intel Mobile Series 4 Family Chipset drivers (yours are probably different) and Intel is not updating them for any of the new Windows products — thanks, guys (-.-!) — so I’ve been messing with work-arounds.

I finally have a solution that actually works and is easy to follow — I’m sure other solutions work, but I had trouble following them as I’m not a computer tech; I only know enough to be dangerous.


Thaddeus – “… the link you provided to the Intel site only works if they have the exact same driver as you. They have to be able to find the appropriate Media Accelerator Driver and 32 vs 64 on their own before any of it will work.”


Windows OS Driver Tweaks:

There are three parts to this tweak.

1) Downloading and modifying Windows 7/Vista drivers (the last Windows drivers with OpenGL),

2) getting Windows to allow you to install unsigned drivers,

and

3) finally installing your drivers.


NOTE: At the end are instructions to disable automatic driver updates. It’s important because if your Windows OS installs newer drivers, that will undo all the tweaks we’ve just made. Luckily, I have another blog on how to roll back the updated drivers.


It might look complicated, but trust me. it’s only detailed steps that are easy to take.

I’ve also been told that it could work—it does—to force Windows 7 drivers to run on the newer Windows OS’s, but it could cause problems. I haven’t had any—and I’ve been using it with Minecraft since 2013—but I caution you to use at your own risk.

Install Drivers for OpenGL to Use with Newer Windows OS’s:

1. Downloading and Modifying  Drivers

First, find your graphics card’s compatible Win 7/Vista drivers in .zip format and Save it. Wait! Don’t unzip/open it yet.

I have the Intel Mobile Series 4 Family Chipset so I found the Intel driver version 8.15.10.2555 (151718).


NOTE:You can download the already unzipped driver, but this is a headache since Windows OS tries immediately to install and hits you with a software/hardware incapatibility error.


How to Download Driver .zip File:

1) Right-click the downloaded driver .zip file; no doubt saved under “Downloads”.

2) Choose Extract to… any folder — write down or remember which folder. I use Winzip to unzip my files.

3) Open the folder where you placed your unzipped drivers. It should look something like this.

Driver Folder Example

4) In the Graphics folder, find igdlh64.inf , (or kit49684.inf in driver 8.15.10.2869, or kit 49659 in newer drivers) right click on it and choose to Open with Notepad.  Scroll to the Driver Information section.


NOTE: Remember not all Win7/Vista drivers are created equal. The newest driver on Intel.com (15.17.19.64.2869/ 8.15.10.2869) does not contain a igdlh64.inf file so see the note below. Mark and Omar replied that in the new Intel drivers (8.15.10.2869) instead of tweaking the igdlh64.inf file (igdlh.inf in 32-bit) under Graphics, a person can do the same to the kit49684.inf file.  I haven’t tried it, but it sounds perfectly logical and workable to me. This is spectacular news in case Intel ever stops offering the old driver downloads.

The “igdlh” file doesn’t read with the “.inf” extension in Windows 10 32-bit; it’s simply listed it as “igdlh”, but it is the only file that is listed as system info and editable in note pad.

5) Copy everything under [IntelGfx.NTamd64.6.0] (or equivalent for 32-bit) and paste it under [IntelGfx.NTamd64.6.2].

Before Copy and Paste:

Drivers Before Tweak

After Copy and Paste, they are the same.
Driver After Tweak

6)  Go to File on the top bar and Save. You can  close the Notepad now.


Time Saving Tip: save your hacked graphics driver file as just that so it’s easyhack Tip for saving driver to find later if you need to reinstall in your Device Manager. The saved hacked igdlh64 is probably not necessary since it’s already in the hacked driver, but I did it anyway. 😜


You’ve tweaked your drivers, but they will not install. Why? By default, Windows new OS’s will refuse to install unsigned or modified drivers. Getting the drivers to  install  requires disabling Driver Signature Enforcement.

2. Disabling Driver Signature Enforcement

Now, we need to start Windows in “Disable Driver Signature Enforcement” mode to install our modified driver, otherwise Windows will just block us.

NOTE: This section includes Windows 8, 8.1, and 10; scroll to your OS.

WINDOWS 10: Disable Driver Signature Enforcement

There are a couple ways to do this in Windows 10, but below is listed the easiest one, and we are all about easy.  FYI: Windows 10 is almost identical to Windows 8.1 so if you’re a visual person scroll up.

Disable the driver signature enforcement in Windows 10.
a. Press together Win + X
b. Click on Settings.
c. Scroll to the “Update & Security” section.
d. Click the Recovery Option on the left hand side.
e. In Advanced Startup section on the right hand side, click on “Restart now”.
f. Once your Computer has rebooted choose the Troubleshoot option.
g. Choose Advanced Options.
h. Then Startup Settings.
i. We’re modifying boot time configuration settings so you’ll need to restart your computer again here. Trust me it’s worth it. 😉
j. Choose the “Disable driver signature enforcement” option; probably F7 key.


You may view print screens at Step 4 below for Windows 10 since they are the same as Windows 8 and 8.1.


WINDOW 8: Disable Driver Signature Enforcement

1) Choose the Settings option (gear icon) in Windows 8 by hovering the cursor over the top or bottom right corner of the screen.

Gear

2) Choose Change PC Settings option

PC Advanced Settings

Windows 8.1 steps differ here (see Step 3a).

3) Windows 8: Choose General on the left hand side. Scroll down to bottom and choose Restart Now

General

–OR–

Windows 8.1: Disable Driver Signature Enforcement

Follow the same steps as Windows 8 until you get through Step 2, then start at 3a.

3a) Choose Update and Recovery

8.1 Recovery and Update

3b) Then Recovery

8.1 restart

  A huge thank you to Eightforums.com for the Windows 8.1 detail.

Windows 8, 8.1, and 10 steps are the same.

4) Click Troubleshoot

Troubleshoot

5) Click Advanced Options


Advanced Options

6) Click Startup Settings


Startup Settings

7) Click the Restart button

Restart

8) Choose the Disable Driver Signature Enforcement (mine is F7)

Disable Driver Sign

9) Enter to restart Windows.

IMPORTANT: There is a significant wait before the next screen appears, my Acer also went to the load screen for a split second. There are a lot of black and blue screens with the dots the circle telling you your computer isn’t dead; wait through these.


Now you should now be able to install the driver needed. After the driver installs, rebooting will enable driver signature enforcement again.


3. Installing Downloaded Drivers


Theo – “tried one last thing [to install drivers]. Run it as administrator and also run it in compatibility mode for Windows 7.”


1) Go to the folder where you saved your modified driver files.

2) Click the Setup.exe file.

Several things will happen. The installer will ask if you’re sure you want to download an unsigned driver. You are, so click 3) Download Anyway. Also the screen will go wonky for a bit during the download. It will return to normal soon.

Intel install screen

4) After install, hover again over top or bottom right corner and choose the Settings option.

Gear

5) Choose Control Panel.

Control Panel

6) Open and go to your Device Manager

Device Manager

7) Expand your Display Adapters


Display adapters

8) Right-click and choose Update Display Software


Update Device Software

9) Browse my computer for driver software.

Browse

10) Choose “Let me pick

Let me pick

Now follow the prompts and install the new drivers you just added.

FYI: No drivers with  WDDM 1.1 will allow OpenGL software.


Pick Driver to Install

Change Automatic Driver Updates:


You do this so Windows doesn’t undo the progress you’ve just spent time making.
Changing automatic driver updates will allow you to decide which drivers to install. Go ahead and install device drivers for your other hardware like printers, etc., but leave your Display Device/Graphics drivers alone. 😀

1) Right click in lower left corner of screen and choose Search


Search-device installation

2) Search under SettingsDevice installation” and choose to change them.

device installation change

3) Choose to Never install drivers.

never install drivers

You’ve done it ! Now start a game that uses OpenGL, like Angrybirds or Minecraft and see how you fare.

NOTE: If you have trouble, someone else probably did, too. Don’t forget to read the comments below. We discussed a few problems there. 🙂 One of them regards older versions of Java.


Thanks to oghd12345  – Java 8 u60 versions or older are causing Minecraft issues. So possibly other OpenGL games will have issues with these versions of Java. If you need a different version of Java, try the company who produces it (Sun Microsystems) or http://www.download.com.


thank you
And thanks for
following
Patti’s Pathways.


DISCLAIMER: Any and all ideas presented in this blog are solely my own unless otherwise noted. I experience troubles with technology just like any other person, and if I stumble upon a fix or suggestion I feel could benefit others I pass it along. At no time, have I suggested or implied that I hold any degrees or certificates related to computer repair.

I have during my career assembled parts into working computers; done troubleshooting on hardware and software; utilized a great many computer programs and software; designed and updated websites and blogs; as well as created brochures, banners, and flyers.