
Welcome to a blog for the everyday techie. Although, there are times intermediate to advanced users can benefit (i.e. Finally, A Fix for Windows 8 OpenGL Error).
Today, we’re talking specifically about scanning or printing without the extra software supplied with your hardware.
Why? Less miscellaneous computer programs means less clutter which increases efficiency, not to mention lessens lag and frees up computer memory. Windows operating systems have a plethora of drivers and functions that make those additional programs unnecessary.
But the big reason I avoid installing pre-packaged software is there are stealth (a.k.a. sneaky backdoor) programs that install with your new hardware drivers. Yep, they’re on digital downloads, but also on the disks included. We’ll cover those another week: Spotting Pesky Add-on Programs You’ll Never Need.
Today’s hint works for printers/scanners, cameras, or any usable device that shows up in your Windows Control Panel.
How to Scan Using Only Windows
I have a HP printer/scanner/fax machine. Yes, it’s ancient, but it still works so I keep it around. Since I don’t want to deal with the tag-along programs (technical terms are “crapware” or “junkware”. I’m not kidding), I initiate it through Windows.
If there are features you want beyond barebones — ink levels come to mind — you’ll need to download the program that comes with the hardware. We’ll cover how to choose the features you need vs. the extra garbage in another blog.
NOTE: I use Windows 8 so finding Devices and Printers through Control Panel may be a bit different for you if you use Windows 7 — the last good Windows Operating System (OS). There is a new Windows OS on the horizon. I’ll tell you about that next week. 🙂
1) Plug the printer USB into the computer if it’s not already. Turn on the printer.
Windows now recognizes there’s a device attached… we hope.
2) Open Control Panel.
I use the Windows key + X.

In Windows 8, the Windows key + X gives me this:

-OR-
You can also access the Control Panel from the Settings menu (hover over the top/bottom right corners of your screen). Click Settings at the bottom.

-OR-
You can access it by typing “control panel” in the application search area. Hover over top/bottom right of your screen, click Search and type in your request.

FYI: In Windows 7, you can simply open your Start menu and in the right column is your Control Panel.
Where were we? Oh yes, initializing your printer/scanner without installing the included programs.
3) In Control Panel, click Devices and Printers.
4) Scroll down. Your printer icons are at the bottom (Arrow 1). The printer with the green check below is your default printer.

What’s Arrow 2? Arrow 2 is where other devices, like cameras, show up. If you don’t find the device you are looking for there, you can Add a Device (Box 3).
FYI: The squiggly lines in the middle is the area any device allowed on your home network shows up. I have twelve or so listed, even people who visit four times a year show up. Yes, the inactive ones can be hidden, but one must jump through hoops and mess with the computer registry. I Just scroll past them. If they really bother you, search “Hide Inactive Multimedia Devices” on the internet for instructions. After reading the instructions, I’m fairly confident you’ll scroll past the multimedia icons also.
5) Click the printer you’re using for the project/letter/whatever you’re scanning.
6) When the next window opens, choose Scan a Document or Picture.

7) The New Scan window opens.
Here’s where you create different profiles for items you’d like to scan. Notice mine. I have Photo which is higher resolution in color and Documents with less resolution in grayscale. 
You can also choose Manage Scan Profiles from the Printer/Scanner window. You’ll get a different looking window, but with the same editing options as the New Scan window.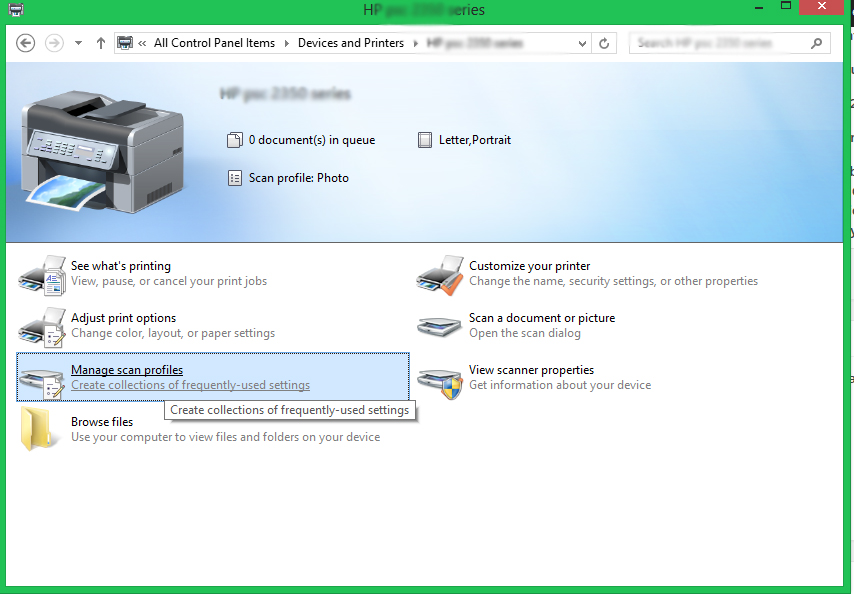
A third way to access Scanner Profile is by right clicking on your printer icon under Devices and Printers (see below). Ninth option down on the menu is Scan Profiles. NOTE: Right above Scanner Profile is a Start Scan command. Yep, you can use that to take you to the New Scan window.
Bingo! You are a scanning-without-any-added-programs pro.
What? You don’t feel like a scanner pro?
There’s a lot of information here. Grab a cup of tea, check your tweets or Facebook, and come back later to reread this huge amount of material.
Remember some of these steps are duplicates. Simply different routes to get the same result. Pick the one you like best and is easiest for you to remember.
ADDED TIP:
I’ve got a secret to show you. How to change the default folder where your pictures/documents/music land.
1) Go to your Libraries folder. I access mine through the file folder icon on the quick launch bar at the bottom of my Desktop.
Alternate ways to get to your Libraries folder: Windows key+X > File Explorer -OR- Windows key+E.

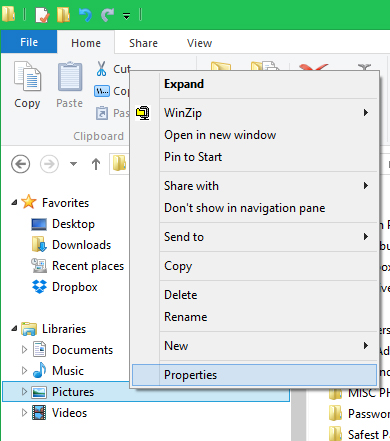
2) Right click on any of the Libraries folder icons to access Properties. We’re talking about photos so we’ll use Pictures for our example, but you can change where to store your documents, music, or videos also.
3) Select Add, then select the folder you wish to store your photos in.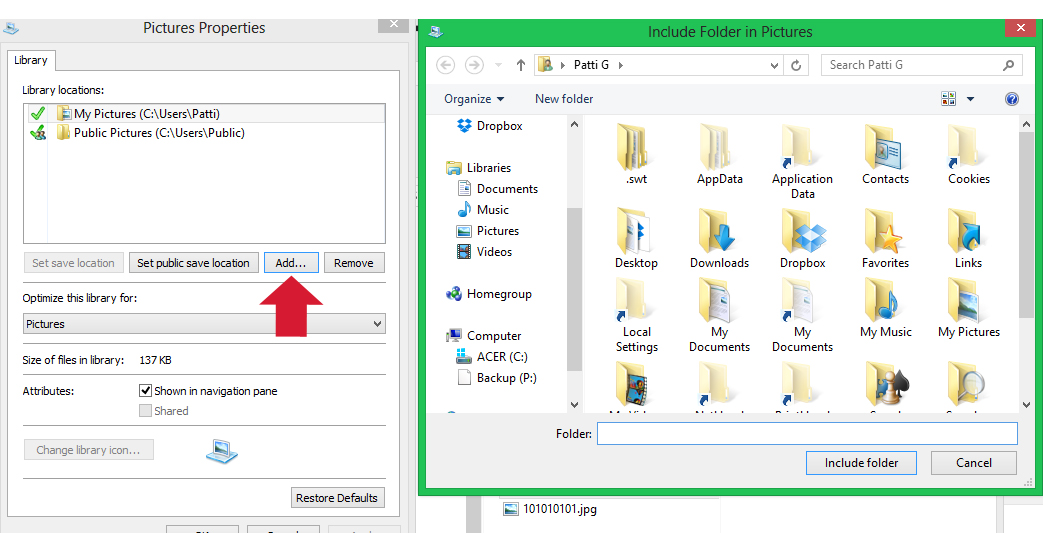
Your chosen folder will now show up in the Picture Properties menu. I have a folder I send pictures to then move within my photo folders (e.g. Holidays, Family, Cartoons, etc.)
4) Click the new folder added, then 5) Apply, and 6) Set Save Location (middle left).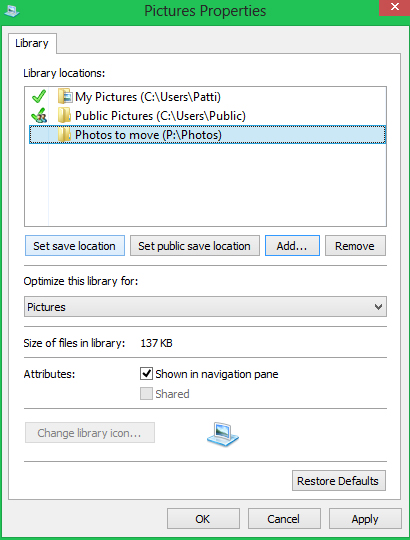
FYI: See the P:\Photos folder? P is for Patti, and I’ve partitioned my harddrive so I can save documents and photos to a location that won’t get reformatted if Windows takes a dive and I have to reinstall. That’s my safety partition until I find time to save my files to an external harddrive or flashdrive.
What? You want to know how to partition your harddrive. That’s another blog. 🙂
If you followed the steps above, you’re done changing where your pictures will save from your devices. Neat trick, huh?
Well, have a super day and happy scanning! And, thanks for visiting Patti’s Pathways. 😀
DISCLAIMER: Any and all ideas presented in this blog are solely my own unless otherwise noted. I experience troubles with technology just like any other person, and if I stumble upon a fix or suggestion I feel could benefit others I pass it along. At no time, have I suggested or implied that I hold any degrees or certificates related to computer repair.
I have during my career assembled parts into working computers; done troubleshooting on hardware and software; utilized a great many computer programs and software; designed and updated websites and blogs; as well as created brochures, banners, and flyers.

