Facebook: Little Known Tips and Tricks

FB logoI’ve been on Facebook again for a while now. I deleted my account for three years, but was talked into reactivating it. Had I known some of these tips my first go ’round, I would’ve tweaked my account so I wasn’t so overwhelmed.

You may already know some or all of these — in which case they’re not little known — but I thought I’d pass along some of the more useful tools and security settings I’ve uncovered anyway.


TIP ONE:

We all have that one person in our Facebook lives. You know the one. They insist we be part of every dental exam, every vet visit, every emotional breakdown, their list goes on. We like them and don’t want to hurt their feelings, but their Facebook posts are just clogging our newsfeed.

UNFOLLOW A NEWSFEED

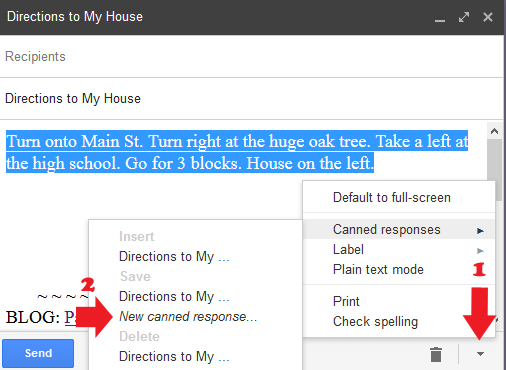
In the example below, if I no longer wanted to see what John Tesh has to tell me, I can hover over the 1) arrow in the top right of his post, then 2) click Unfollow John Tesh. John won’t know, and I’ll just no longer see his newsfeeds on my Facebook page.
Unfollow


John’s Facebook account is public or I’d have blurred out his info. It’s a great site.

FB TIP TWO:

HIDE GROUP NEWSFEEDS:

I’m a member of several Facebook groups. One group has thousands of members so the posts get overwhelming. I like this group and want to remain a member of it but at my leisure.

We can do the same thing with groups as we did with an individual. Instead of Unfollowing though, with Groups it’s known as Archiving.

1) Navigate to the Group’s home page, and 2) click the ellipsis. Yep, that’s its name. Then 3) choose Archive Group.Archive Group


4) View the ominous warning, and click “Archive”.
Archive Warning


I have a short memory so I’ve decided I want to reactivate my group newsfeeds. And how could I forget John Tesh has intelligence for my life so I want his newsfeed back also.

TIP THREE:

Unarchiving a Group Feed/Refollowing a Person

1) Find the News Feed Settings gear, and 2) choose Edit Settings.
Newsfeed Settings Gear


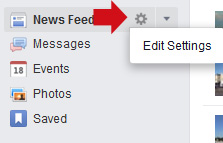
3) Click the “x” beside the group/person you’d like to view posts again on your Facebook page.
unarchive group


4) Click Save. Now all the newsfeeds you’ve selected are back.


 TIP FOUR

Ever want to post something you really don’t want your boss to see? How about posts you really, really don’t want Aunt Agnes to see? Or something less nefarious: a joke only a few good friends will understand.

You’d need a way to select who you send what. Facebook has that.


You can accomplish your goal of sending posts and photos to chosen Facebook friends in one of two ways: 1) create a list, or 2) set up a group.

With lists or groups, your bff sees everything — articles, jokes, sayings, emo rants — while co-workers can only see a few jokes or an article you shared about production.

Facebook has already included lists for you to populate. There are Close Friends for people you keep in contact with, and Acquaintances for people you don’t. Restricted is useful for people like your boss and managers; I’d include co-workers with the insatiable need to gossip in this list also. Or you can create you own.

What’s the difference?

Stuff Lists Do Groups Can’t

  • Lists are connected to your security settings.

NOTE: If you use a list to limit your audience, your default may reset to that list. I’ve had that happen, but can’t verify or recreate it happening every single time. If it does, you can change it by setting the next post to Friends or whichever list you wish the post sent. Or you can do it through settings.

Under 1) Settings
FB Settings

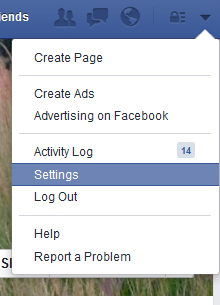
2) Click Privacy in the left margin, then you can see and set a default.
Privacy List


  • Lists will not notify all your Facebook contacts you’ve create a new list. When you create a new group, it’s blabbed all over your Facebook.

Stuff Groups Do Lists Don’t

1) Groups limit what people view on your wall. You can set a group to only see what you’ve posted for that group.

You could do this for lists, but you’d need several monster lists minus the special people you wish to un-include.

2) Groups are customizable.

  • You can set a specific picture to represent your group.
  • Administrators can be assigned.
  • Groups can have their own customized email address.
    This is kind of a neat feature. When information is sent to the Group’s email address, it posts to their wall.

3) You can use the Share feature on Group posts.  Lists don’t support this function.


Making a List

1) On your Home page’s left-hand margin, scroll down and hover over Friends, then  2) click More.
Friends-More


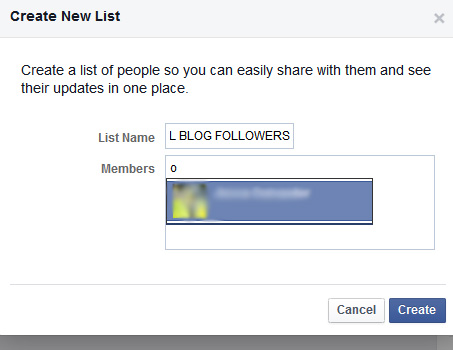
3) Click Create List
Create list


4) Add people to your new list.
Facebook makes it easy. When you type a letter, you’ll get friend choices.
Add to friend list


Using Your New List

When you post in the “What’s on your mind?” Facebook box, you can choose your  list.

1) Write your thoughts or insert your photo, and 2) Choose your list.
Select List of Friends who see post

Yes, I have tested this. Only the people on your list can see your post.

FYI: If you switch lists, your post is removed from the original recipient’s page and resent to the new receiver.

Remember: the List function may set the last list used as your default.

Updating Your Lists

1) Simply click on the list name in the right margin, 2) click Manage List to add or delete people, change the list name, plus more.
Update Friends List


Creating A Group

1) Click on Create Group under your Groups area in the left margin.Create Group side panel

2) Pick a name, 3) add members, and 4) choose your Privacy specs.
Create target list


TIP FIVE:

You’ve got your security settings just like you want them… secure. So you might not want everyone and his dog —yes, some canines love Facebook — seeing your reply comments.

Are you ever curious about who can see what you write on someone else’s post?

Who Can View Your Comments

Hovering over the icon below their name tells you exactly who can see your replies/comments.

The first person’s Facebook posts are Public, the second are only Shared with their friends.Public-private sharing


TIP SIX:

Did you realize that your Facebook Friends can take your secure information with them to other apps or games? Apps are usually granted access to FB information when a person logs into other websites with their Facebook account.

When you give a trusted contact free rein to your information, they could be giving it away and not even know it.

Secure How Much of Your Information Others Can Share

1) Go to Settings, 2) Apps in the left margin, and 3) scroll down to Apps Others Use and 4) click Edit.
Apps others use


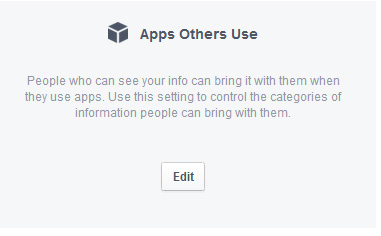
5) Uncheck what you don’t want passed on and 6) Save. I’ve unchecked everything.

HELPFUL HINT: While you’re at the bottom of the Apps page, I’d recommend disabling the Instant Personalization option. This prohibits your public info from being used by Facebook’s third-party partner sites, like TripAdvisor or Pandora.

TIP SEVEN:

If you want to be a courteous friend and not bombard people with paid ads from stuff you like, you can turn that feature off.

1) Go to Settings, 2) Ads in the left margin, 3) click Edit by Ads And Friends. Set it to 4) No one and 5) Save.Facebook ad


HELPFUL HINT:
While you’re on this page, set your Third-party Sites (above Ads and Friends) to No one just in case at some future date Facebook decides to sell its user lists.

TIP EIGHT:

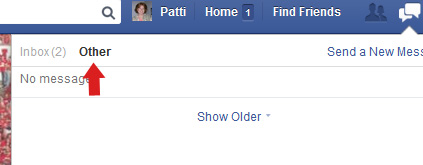
Did you know you have an “Other” message box? If your Facebook page isn’t Public and someone who’s not your FB Friend sends you a message, it ends up in your Other box.

If you click on the word bubble icon to get to your messages, you’ll also see your Other tab.
Other Message Box


Now that your to-do list is overflowing with Facebook tasks, I’ll leave you alone to digest this post. I have one last tip: Like the Facebook Security page. You’ll get the latest in threat news, plus some great internet safety tips here.

Have a super week, and thanks for visiting Patti’s Pathways. 😀


DISCLAIMER: Any and all ideas presented in this blog are solely my own unless otherwise noted. I experience troubles with technology just like any other person, and if I stumble upon a fix or suggestion I feel could benefit others I pass it along. At no time, have I suggested or implied that I hold any degrees or certificates related to computer repair.

I have during my career assembled parts into working computers; done troubleshooting on hardware and software; utilized a great many computer programs and software; designed and updated websites and blogs; as well as created brochures, banners, and flyers.

A Notch in the Belt of Microsoft

Yep, another special midweek edition. This one isn’t about flash fiction — although some gamers may hope this is fiction, but it’s not — it’s about the biggest gaming news in years. That’s my opinion, but prove me wrong. Can’t, can ya’?

microsoft logo roundThe major gaming announcement this week is that the Microsoft Corporation has purchased Mojang AB (owner of the popular Minecraft video game) for $2.5 billion USD. That’s billion… with a B. I know what you’re thinking: But Patti, in the 2014 fiscal year Microsoft Corporation’s net profit was 22.07 billion USD; they can afford it.

You’ve convinced me. They can afford it, and it might just be the best money they’ve spent lately. Why?

Avatar_Creeper_100x100Markus Persson (aka Notch to the gaming world), Swedish programmer and kingpin of Minecraft, has been a thorn in Microsoft’s side of late. First, with his anti-Windows 8 stance. Remember, he refused to update Minecraft to work without OpenGL? Trust me, he did. That’s how this blog got started. See my first post Finally a Fix for Windows 8 OpenGL Error.

Persson also stated there was no pressing reason to create a Minecraft version for Microsoft’s Windows phones. Minecraft is one of iPhone and Android’s most popular mobile apps, and those two operating systems have a 95% share of the world mobile market according to Business Insider. Microsoft Windows phones are barely a speck on the smartphone horizon. Could there be a correlation? Possibly. But I do see a trend Microsoft could well want to take a Notch out of.

Well, Mr. Persson, tick off a gigantic corporation and watch their thinktank wheels turn. They usually will come up with an offer you can’t refuse. And you didn’t. Why sell your baby to a company you obviously despise?

Since its launch in 2009, Minecraft has sold over 50 million copies for PC’s, smartphones, and video game consoles. Its annual revenue last year was $290 million. While that’s small potatoes for Microsoft, it’s sizable for a company like Mojang AB.

Minecraft is taking off like wild-fire. There are Minecraft-themed camps, Halloween costumes, Scholastic gaming guides, Lego characters, and a soon-to-be Warner Bros. movie. Don’t forget the online Minecraft projects, YouTube and Twitch tips and tricks posts, and teachers using it to educate students in computer programming classes. Oh, and Minecraft is one of the most played Xbox games in the world.

Its popularity is the core of the problem. Persson can’t keep up. He’s frustrated managing something so large, plus he’s having difficulty keeping development pace with demanding Minecraft fans.

giant babyIn essence, Persson’s baby has grown too big for him to care for. His best course of action is to find someone with experience to nurture it and see to its future.

But before we get too sentimental, don’t forget he had 2.5 billion reasons to entrust the baby’s care to Microsoft.

Persson posted on his personal website: “Thank you for turning ‘Minecraft’ into what it has become, but there are too many of you, and I can’t be responsible for something this big.”

Serious gamers are grumbling a corporate takeover will ruin Minecraft’s homegrown, Indie flavor. But honestly, I saw this coming when Walmart started selling Minecraft plushies. That was the beginning of the end for the Indie marketing strategy.

What’s my opinion and thoughts for Minecraft’s future?

Personally, I think this could be a very good thing for Minecraft fans. A friend mentioned his hopes of Microsoft stabilizing Minecraft’s online servers. I hadn’t even thought about that.

Things I had thought about were new game content, and more rapid implementation of suggested improvements. I’d also thought about corporate greed. Will Microsoft decide to offer added Minecraft features and content for money? Currently, you buy Minecraft — $7 to $27 USD depending on the platform for play — and everything is included; all updates are free.

Nobody really know how this scenario will play out, but let’s pray there are relatively few growing pains.

Have a great rest of the week, and thanks again for stopping by Patti’s Pathways. 😀


DISCLAIMER: Any and all ideas presented in this blog are solely my own unless otherwise noted. I experience troubles with technology just like any other person, and if I stumble upon a fix or suggestion I feel could benefit others I pass it along. At no time, have I suggested or implied that I hold any degrees or certificates related to computer repair.

I have during my career assembled parts into working computers; done troubleshooting on hardware and software; utilized a great many computer programs and software; designed and updated websites and blogs; as well as created brochures, banners, and flyers.

Password Protecting Folders In Windows 8

This post was originally going to be “How to Permission Protect Your Windows 8 Folders” because chatter on the web said there is no way to password-protect folders in Windows 8.

dancer, german femaleSurprise! You can password protect folders in Windows 8. You do this by using a zip program and archiving your special folder. After doing a bunch of dancing around, you’ll get password protected folders and files.

Be forewarned. The choreography sounds complicated, but you’re a good dancer so I think you can follow.

Now… get ready to dance. I’m leading.

Dance Step One:

Create a Restore Point.

In Windows 8 and 8.1 to create a restore point go to Control Panel > Recovery > Configure System Restore. Don’t forget there’s always an uninstall option at Control Panel > Programs if you don’t like a program.

Dance Step Two:

Find a good file archive program. I have WinZip, but the free archiver I tested for my faithful readers is 7-Zip.

What’s a file archive program? A file archiver either 1) compresses information to take up less hard drive or download space, or 2) makes files and folders easier to send between people since they are archived with file content and not a specific file system.


MORE THAN YOU EVER WANTED TO KNOW ABOUT FILE SYSTEMS: Different digital devices use different file systems to store data. Flash drive content is stored differently than CDs/DVDs. Different operating systems also have different file system types. Microsoft/Windows file system (usually FAT or NTFS) is different from the Macintosh/Apple file system (HFS). For the pre-computer crowd, think Dewey Decimal System versus strict alphabetical order.Rumba

Now to toss a watusi step into a rumba dance to confuse you further. File systems are not the same as file extensions (.exe, .doc, .jpg, .zip, .bat, .epub).


Why did I choose 7-Zip to test? Out of 5 stars, it still has a 4- to 4 1/2-star approval rating from users after 8 million downloads at cnet.com. Cnet editors gave the 32-bit a 5-star rating, but didn’t rerate the 64-bit program. I’m using 64-bit with no troubles.

Psst! If you’ve been following this blog, you’ve figured out my favorite program download site is cnet (download.com). I’ve used it for years and have never gotten a virus, plus little or no adware sneaks in with your downloads.

HEADS UP: On download.com — and a lot of other download sites — don’t be confused by paid advertisers on the same page as program downloads. Paid advertiser download buttons are in a box usually with the name of the paid program beside the button.Download 7-zip

In the above example, the top free download is RegClean Pro. The name’s fairly well hidden, but you can find it if you try. The second impersonator for our download is Bitdefender. I’m sure it’s a very nice program, but we don’t want it today. We want 7-Zip.


7-Zip
http://download.cnet.com/7-Zip/3000-2250_4-10045185.html

7-Zip 64-bit
http://download.cnet.com/7-Zip-64-bit/3000-2250_4-10905593.html

After downloading 7-Zip, follow the prompts to install.

Oh good, the band is back to playing our waltz.

How To Password Protect Items in Windows 8

1) Find the folder you wish to password protect.

For demonstration purposes, I made a TEST Test Folderfolder on my desktop. I’d suggest you do the same until you are familiar with how this works. Toss a test.doc or two into your TEST folder. You’ll need something to protect or it doesn’t work. At least, it didn’t for me.

Note on Photos and Clipart: .jpg, .gif, .png, and others save in zip archives, but don’t open. Some premium archiver programs have an image viewer capability. If you don’t have one of those, you can unzip/move the photo to a regular unarchived file/folder to view.

2) Right-click your TEST folder, 3) choose 7-Zip, then 4) Add to archive…7-zip

5) Make sure the Archive Format is zip, and the Encryption method is ZipCrypto. This allows someone you’ve given the password to the ability to open this file with any zip program. 6) Enter a password of 8 digits, and 7) Press OK.
Add to archives

8)  Locate the .zip folder you’ve just created.

The easiest way is clicking the Taskbarfolder icon on your task bar, then under Desktop find your TEST folder. You can also use Windows key + X, and search for your .zip folder with the File Explorer.

Your original TEST folder is still there. That’s the one you made first, but not the archived one. To find the archived one, scroll down a little farther. If you see a TEST.7z folder, you archived your folder in 7-Zip format.Test

Did you notice my archived folders show as WinZip files? That’s because WinZip is my default archive program.  My new password protected files open in WinZip also.

9) Left-click on your TEST.zip folder and you’ll get a prompt to enter a password. That’s the password you just assigned in 7-Zip: Add to Archive. 10) Enter your password.
Password

10) Choose the document in the folder you wish to open/edit. Now you’re free to edit the item as you wish.

FYI: If you don’t close the archived folder, you shouldn’t need to reenter the password to access other documents in that folder.

A WORD ON SAVING YOUR FOLDER:

When you exit your new .zip folder, 7-Zip is so nice, it’ll ask if you want to update it. You do.
7-zip save

WINZIP NOTE: If you’re default program is WinZip, you’ll get this save screen.
SaveYou want the top option. WinZip now asks for another password. It must think an updated document needs an updated password. I use the original pass I set. If you don’t edit the file, WinZip doesn’t ask to update the password.

There. You’re done! You’ve created a new password protected .zip folder, and you’re free to delete your original folder.

I played around for a while before actually deleting any folders. My password protected folders are still working. All seems right in the .zip computing world.


Are there any downsides?

The only downside I see is adding items to your protected .zip folder.

Creating new folders in either 7-Zip or WinZip is easy. Right-click in the protected folder body (or chose the File command at the top bar), then left-click “New Folder” or “Create Folder”.

The tricky step is adding documents or photos within a protected folder in 7-Zip.

Archive programs are made to conserve space or make data more portable, not as a place to create documents, view photos, et cetera.

7-Zip:

Let’s talk about adding items in 7-Zip first.

I will requote the old adage: You get what you pay for. This free program makes it necessary to dance around again to add items.

7-Zip does have a “Create File” option, but for some reason, it doesn’t work for me nor can I find anyone on the forums who succeeded with it. Let me know if it works for you.

To add photos or documents using 7-Zip, they need to be 1) archived first (a new .zip made), then 2) dragged and dropped into your password protected archived folder. Cut and paste aren’t supported.

It might be of greater benefit in 7-Zip to resave old items from your protected folder in a new regular folder with the new items you want to password protect, then rearchive them all.waltz

Why? Each added item equals a new folder. Soon, if you have a lot of super secret stuff, you’ll have oodles of folders to waltz through to find the one you want.

WINZIP:

Adding photos or documents using WinZip is much easier.  1) Create and save your item as usual. 2) Drag and drop it into your password protected Winzip folder. 3) With the document name highlighted, 4) open Tools, and 5) choose Encrypt Zip File.

When it asks a password, continue with the steps you used before to edit and save it. When you close your newly added file, WinZip will password protect it.


I know this is a lot to process, but if you wish to password protect your data in Windows 8, you must learn the tough routines. And pray Windows 9 allows password protecting files again then upgrade.

You should pat yourself on the back though. hula bear and penguinYou’re a great dance partner. Now sit this next set out and put your feet up, you’ve worked hard.

Have a productive week, and thanks again for following Patti’s Pathways. 😀


Other posts that compliment this one:

Creating the Safest Passwords

On The Threshhold of Windows 9


DISCLAIMER: Any and all ideas presented in this blog are solely my own unless otherwise noted. I experience troubles with technology just like any other person, and if I stumble upon a fix or suggestion I feel could benefit others I pass it along. At no time, have I suggested or implied that I hold any degrees or certificates related to computer repair.

I have during my career assembled parts into working computers; done troubleshooting on hardware and software; utilized a great many computer programs and software; designed and updated websites and blogs; as well as created brochures, banners, and flyers.


How to Spot a Hoax Email

super www womanI  received another hoax email last week. I’m not viewed tenderly by most people who send these. Why? Because I believe it is my charge in life to single-handedly rid the internet of hoax and fake emails. Ka-Pow!

I do this by not forwarding them, and bringing the email status to the attention of the person who forwarded it.

There are at least three problems with this approach.
1) A million other people still forward these thinking they’re true.
2) Haters don’t care as long as the hoax email damages the reputation of their target.
3) Innocent forwarders can be offended.

Hence, the purpose of this blog.

“Gathered together from the cosmic reaches of the universe – here in this great hall of justice – are the most powerful forces of good ever assembled.”

Yep, the Super Friends narrator is talking about you!  Never saw that coming, did ya’?

You’re being recruited by the renown organization A.T. (the Accuracy Team). We, at @, stand for truth, justice, and the cyber highway.


The A.T. Not-so-super-secret Training Manual

Spotting hoax emails isn’t hard if you know what to look for. About 90% of the emails I choose to verify turn out to be hoaxes. The 10% that aren’t usually surprise me.

Some hoaxes are merely annoying while others can cause financial hardships or worse.

What do I look for in a hoax email or photo?

  • Does the email picture or quote a person or business in the public eye?

    emailAll hoax emails refer to famous people or entities: politicians, tv/movie/radio personalities, famous athletes, or major corporations.

How many hoax emails circulate with quotes from Mildred Smith of Poughkeepsie, N.Y. or from Brad’s Lawn Service? And if they did, who would care?

  • Is the person mentioned smart enough to foresee the consequences of performing said appalling action?

Example One: The below photo is circulating. The claim is the Obamas were caught blatantly disrespecting our wonderful country by using their left hands during [pledge of allegiance, national anthem, add your own].

Since I know neither one of the Obamas is stupid, and both smart enough not to want the massive public outcry this shameless diss would bring — hey, it was his first term in office — I decided to verify the info before forwarding.

My investigation uncovered the truth. The picture is Photoshopped. The creator did a bang-up job by adding wedding rings and switching the buttons on the President’s coat. He just forgot one teensy, glaring item: marines always wear medals on the left chest. It’s protocol. There’s an entire chapter devoted to how to, where to, and when to wear medals in the marine handbook.obamas_lh_flag_salute

I didn’t find who took the original, but it ran in Newsday and was taken during the playing of Taps on September 11, 2009.

In all fairness, I’ll include a hoax photo from our last Republican president. Opponents on both sides of the political machine try so hard to discredit one another it’s embarrassing.

This photo is also a product of Photoshop. The book is America: A Patriotic Primer by Lynne Cheney. Notice the back cover of the book G.W. is holding? The black blob (red arrow) — no clue what it is — is on the wrong side if the book were flipped around. It’s located opposite on the book the girl is reading.bushbook
I tried to find the original of the back cover photo (Lynne Cheney surround by children, some with flags) to identify the black blob, but I had no luck.

The original of this is an Associated Press photo.

Today’s tip to haters? If you digitally alter photos, don’t use pictures from big name media outlets. They’re so easy to debunk.

  • Does the email include the words “This is NOT a hoax.” or “This is REAL!”?

Have you seen that Bill Gates is giving away $5,000 to anyone who shares a certain picture of him on Facebook? “IT IS FOR REAL”. It’s not, and he’s not.


The above types of hoaxes are annoying, fill your Inbox, clog the Internet, and waste the time of millions of people.

But do they cause lasting hardships for people? Probably not. The targets are people who are accustomed to being stalked and slammed by the media so I’m sure email hoaxes don’t mean a great deal to them.

Actually, this week elites are busy worrying about iCloud hackings. This is exactly why my blog post How Secure is Dropbox? cautions people against uploading important or personal information onto a cloud service. If you’re not comfortable with the data or photos falling into the hands of unscrupulous people, don’t share them there.


Now, pay attention.

Up to this point we’ve talked about irritations. Our conversation is now turning very serious.

Danger

There are emails hoaxes which fall under a category I like to call “felonies”. They are life-altering and some have major financial consequences.

Email Hoaxes that can seriously cost you.

  • Emails that ask for a credit card numbers.

You’re too smart to fall for that, right? How about the one below? It’s a complete hoax. Looks legit, doesn’t it? It’s easy to copy and paste a logo into a mock-up business mailing. Don’t fall for it.
021604-yahoo-phishing-scam

IMPORTANT WARNING: Notice you can “update your credit card information by clicking here” That “here” takes you to a bogus website setup for the specific purpose of stealing your credit card information.

  • Emails that ask for cash to get something.

If they didn’t cost innocent people their hard-earned savings, I’d find some of these emails hilarious.

An example is the email featuring a letter from the FBI legitimizing the Nigerian Minister of Finance’s offer of $800,000 on an ATM card for wiring $550 USD to an account. Doh!

NOTE: Anything from a country you’ve never visited, like Nigeria or Singapore, is probably a scam unless the person asking is a long-time friend or associate. But please, be equally cautious if you do know the Nigerian Minister of Finance.

  • Emails that ask for personal information.

No legitimate organization will EVER ask for your social security number, bank account number, or PIN number via email.

  • Emails that give you a clickable link.

Remember the Yahoo! scam email above with the “click here” option? Cyber thieves put their blood, sweat, and tears into their endeavors. If only a small percentage of their emails succeed, they’ve made tens of thousands of dollars illegally.

Capital OneCapital One has a great section on internet security. Thanks, Capital One!

Capital One Security Education Center  The Fraud Prevention Topic item two on phishing has great advice on spotting bogus emails.


Now that you know how to spot them, let’s talk about authenticating scam/hoax emails.

How do I verify hoax emails?

You’ve received an email you think is a hoax. How do you know for sure?

One word: Google. Search engines are a beautiful thing.

In Example One above, I searched something like “Obama left-handed pledge?”. You can add “hoax” or “fake” to the search if you’d like. You should quickly find enough research to know if something is a hoax.

WORD OF CAUTION: Remember, everyone has an agenda. Never rely on one site’s opinion unless the fraud is so obvious common sense dictates no further research is required. The marine medal’s or the book cover in the above examples pretty much made further investigation unnecessary. Those alone proved the photos fake.

I suggest using one (or more) ultra-liberal, and one (or more) uber-conservative sites for each verification, if needed.


What to do if you’re being targeted by scammers.

If you think you’re the target of internet thieves, all email providers have “Report Phishing” functions. They take this very seriously.

Gmail Report Phishing


In Gmail. 1) Open the email, 2) left-click the options menu (little arrowhead) on the very top right and 3) select “Report phishing”.


In Outlook, there is a “Junk” tab at the top.

Outlook Phishing

If you use a different email program, search “Report phishing” in their Help or “[Program name] report phishing”on the Internet.  You should find what you need to file a report.


PARTING THOUGHTS:

With politicians, Hollywood elites, and athletes doing dumb things daily,  we certainly don’t need to make up stuff or enable others who do.SuperBusinessman

Scams are everywhere. Not only in emails, but on social media sites.

Be cautious and do your part. Use your newly acquired superhero powers to help make the cyber highway a safer place to travel for everyone.

Have a great week, and thanks for visiting Patti’s Pathways. 😀


DISCLAIMER: Any and all ideas presented in this blog are solely my own unless otherwise noted. I experience troubles with technology just like any other person, and if I stumble upon a fix or suggestion I feel could benefit others I pass it along. At no time, have I suggested or implied that I hold any degrees or certificates related to computer repair.

I have during my career assembled parts into working computers; done troubleshooting on hardware and software; utilized a great many computer programs and software; designed and updated websites and blogs; as well as created brochures, banners, and flyers.

On the Threshhold of Windows 9

Toward the end of September — September 30 to be exact — I’ll be spying on computer world news. Spy with newspaper

Intelligence reports mark this date as a likely press event to unveil Windows 9 (code-name: Threshhold).

In April 2014, attendees at the Build conference were treated to a sneak peek of Threshhold. Rollout date is currently set for April 2015.

Why the hurry? Windows 8 just debuted. Therein lies the problem.

Windows 8 has received a less than stellar reputation. For the general computing public, Windows 8 is too heavy on apps and too light on desktop functionality. Honestly, I like Windows 8 —  my previous OS was Vista, the OS that almost single-handedly brought down the free world. I’ve also not upgraded to 8.1 because of a number of sketchy reviews from people who did.

I’m praying Microsoft’s trend of great OS – poor OS – great OS – poor OS continues making Windows 9 the next XP or 7. Sometimes I wonder if Microsoft releases bad OS’s on purpose so the good ones look phenomenal by comparison. I know, I know. What happened to my glass-half-full mentality? It’s still here, just undercover. 😉


On the Threshhold of Windows 9

I’ve tracked down a few new features of Windows 9. Beware, nothing is one hundred percent set in concrete gumshoes.

Changes/features may or may not be universal across desktops, laptops, and tablets (we hope not); and Microsoft could tweak anything to insure the best performance for each specific hardware device (we hope so).

NEW WINDOWS 9 FEATURES:

    • Start menu is back, just when we Windows 8 users figured out how to live without it. It’s probably like a bicycle: once you can learn, you never forget.
    • This is a leaked printscreen of the new Start menu.Windows_9_Start_Menu_Neowin


  • Removal of the Charms bar.side commands

Remember the Windows 8 bar that opens when you hover over the right top or bottom of your desktop? Yep, that’s the Charms bar. Honestly, it’s more of an Apple-wanna-be bar. It’s not coming back. At least not in Windows 9.

  • Metro apps are still a part of Windows 9, but in  a much lesser capacity… or so it’s said. Some of the leaked screenshots make me wonder about the reliability of the operatives. They’re reporting Window 9 Apps will open in small desktop windows.

What’s a metro app?  It’s all those little box programs that show up on the Windows 8 Start Screen, including the ones you added from the App Store.  Metro apps are fantastic if you have a touch screen tablet, but — as everyone found out with Windows 8 — not very user-friendly for keyboard computers.

  • Greater ability to personalize.Windows-9 Personalize


  •  Cortana — Microsoft’s voice-based assistant currently available on Windows Phone only — could be part of Windows 9.

Don’t panic. You’ll probably be given the choice to turn her off and on. And guys? Enjoy it. You may never get a chance to silence a woman this easily again.

  • Possibility the new Windows OS will be subscription-based.

Rumors are flying about the price. Software watchers vary in opinion of the cost from Windows 9 being free or negligible to subscription-based. Remember Office 365 priced at $100? It’s a subscription-based MS program. You get to use it for 365 days. When your subscriptions runs out — you guessed it — you have to pay again. Personally $100 annually for an upgrade is way to expensive for my taste. If Microsoft charges a subscription fee anywhere close to Office 365, and Windows 9 doesn’t perform up to expectations, this could start the next Cold War with OS defections inevitable.

I’ll leave you with a few more leaked screenshots of Windows 9. Enjoy.

Thanks again for following Patti’s Pathways. 😀


Windows 9 Desktop:
Windows-9-Design-Mixes-the-Desktop-and-the-Modern-UI-Screenshot-385249-2


Outlook:
Outlook-Windows-9


DISCLAIMER: Any and all ideas presented in this blog are solely my own unless otherwise noted. I experience troubles with technology just like any other person, and if I stumble upon a fix or suggestion I feel could benefit others I pass it along. At no time, have I suggested or implied that I hold any degrees or certificates related to computer repair.

I have during my career assembled parts into working computers; done troubleshooting on hardware and software; utilized a great many computer programs and software; designed and updated websites and blogs; as well as created brochures, banners, and flyers.

Scanning Without Extra Program Downloads

Welcome to a blog for the everyday techie. Although, there are times intermediate to advanced users can benefit (i.e. Finally, A Fix for Windows 8 OpenGL Error).Printer

Today, we’re talking specifically about scanning or printing without the extra software supplied with your hardware.

Why? Less miscellaneous computer programs means less clutter which increases efficiency, not to mention lessens lag and frees up computer memory. Windows operating systems have a plethora of drivers and functions that make those additional programs unnecessary.

But the big reason I avoid installing pre-packaged software is there are stealth (a.k.a. sneaky backdoor) programs that install with your new hardware drivers. Yep, they’re on digital downloads, but also on the disks included. We’ll cover those another week: Spotting Pesky Add-on Programs You’ll Never Need.

Today’s hint works for printers/scanners, cameras, or any usable device that shows up in your Windows Control Panel.


How to Scan Using Only Windows

I have a HP printer/scanner/fax machine. Yes, it’s ancient, but it still works so I keep it around. Since I don’t want to deal with the tag-along programs (technical terms are “crapware” or “junkware”. I’m not kidding), I initiate it through Windows.

If there are features you want beyond barebones — ink levels come to mind — you’ll need to download the program that comes with the hardware. We’ll cover how to choose the features you need vs. the extra garbage in another blog.

NOTE: I use Windows 8 so finding Devices and Printers through Control Panel may be a bit different for you if you use Windows 7 — the last good Windows Operating System (OS). There is a new Windows OS on the horizon. I’ll tell you about that next week. 🙂


1) Plug the printer USB into the computer if it’s not already. Turn on the printer.

Windows now recognizes there’s a device attached… we hope.

2) Open Control Panel.

I use the Windows key + X.
windows-keysmall


In Windows 8, the Windows key + X gives me this:
Control Panel

 -OR-

You can also access the Control Panel from the Settings menu (hover over the top/bottom right corners of your screen). Click Settings at the bottom.
Setttings Shortened


-OR-

You can access it by typing “control panel” in the application search area. Hover over top/bottom right of your screen, click Search and type in your request.
Control Panel-App

FYI: In Windows 7, you can simply open your Start menu and in the right column is your Control Panel.

Where were we? Oh yes, initializing your printer/scanner without installing the included programs.

3) In Control Panel, click Devices and Printers.Devices and Printers


4) Scroll down. Your printer icons are at the bottom (Arrow 1). The printer with the green check below is your default printer.
Devices and Printers with arrows.

What’s Arrow 2? Arrow 2 is where other devices, like cameras, show up. If you don’t find the device you are looking for there, you can Add a Device (Box 3).

FYI: The squiggly lines in the middle is the area any device allowed on your home network shows up. I have twelve or so listed, even people who visit four times a year show up. Yes, the inactive ones can be hidden, but one must jump through hoops and mess with the computer registry. I Just scroll past them. If they really bother you, search “Hide Inactive Multimedia Devices” on the internet for instructions. After reading the instructions, I’m fairly confident you’ll scroll past the multimedia icons also.

5) Click the printer you’re using for the project/letter/whatever you’re scanning.

6) When the next window opens, choose Scan a Document or Picture.
scanner


7)
The New Scan window opens.

Here’s where you create different profiles for items you’d like to scan. Notice mine. I have Photo which is higher resolution in color and Documents with less resolution in grayscale. scanner profiles


You can also choose Manage Scan Profiles from the Printer/Scanner window. You’ll get a different looking window, but with the same editing options as the New Scan window.scan profile


A third way to access Scanner Profile is by right clicking on your printer icon under Devices and Printers (see below). Ninth option down on the menu is Scan Profiles. NOTE: Right above Scanner Profile is a Start Scan command. Yep, you can use that to take you to the New Scan window.Right Click on Printer


Bingo! You are a scanning-without-any-added-programs pro.Thumbs up

What? You don’t feel like a scanner pro?

There’s a lot of information here. Grab a cup of tea, check your tweets or Facebook, and come back later to reread this huge amount of material.

Remember some of these steps are duplicates. Simply different routes to get the same result. Pick the one you like best and is easiest for you to remember.

 ADDED TIP:

I’ve got a secret to show you. How to change the default folder where your pictures/documents/music land.

1) Go to your Libraries folder. I access mine through the file folder icon on the quick launch bar at the bottom of my Desktop.

Alternate ways to get to your Libraries folder: Windows key+X > File Explorer -OR- Windows key+E.

Psst1
2) Right click on any of the Libraries folder icons to access Properties. We’re talking about photos so we’ll use Pictures for our example, but you can change where to store your documents, music, or videos also.
LIbraries


3) 
Select Add, then select the folder you wish to store your photos in.Picture Properties

Your chosen folder will now show up in the Picture Properties menu. I have a folder I send pictures to then move within my photo folders (e.g. Holidays, Family, Cartoons, etc.)

4) Click the new folder added, then 5) Apply, and 6) Set Save Location (middle left).Set Save Location


FYI: See the P:\Photos folder? P is for Patti, and I’ve partitioned my harddrive so I can save documents and photos to a location that won’t get reformatted if Windows takes a dive and I have to reinstall. That’s my safety partition until I find time to save my files to an external harddrive or flashdrive.

What? You want to know how to partition your harddrive. That’s another blog. 🙂


If you followed the steps above, you’re done changing where your pictures will save from your devices. Neat trick, huh?

Well, have a super day and happy scanning! And, thanks for visiting Patti’s Pathways. 😀


DISCLAIMER: Any and all ideas presented in this blog are solely my own unless otherwise noted. I experience troubles with technology just like any other person, and if I stumble upon a fix or suggestion I feel could benefit others I pass it along. At no time, have I suggested or implied that I hold any degrees or certificates related to computer repair.

I have during my career assembled parts into working computers; done troubleshooting on hardware and software; utilized a great many computer programs and software; designed and updated websites and blogs; as well as created brochures, banners, and flyers.

Flash Fiction Short – Inside Out

If you didn’t know already, I write fiction as a hobby, not to mention a release. There’s a link to my author website in the right margin. Nothing’s published yet, maybe some day.

Over the summer, I entered a few flash fiction contests. Haven’t won anything and probably won’t, but writing short stories turned out to be great fun.

For a mid-week treat, I’m posting one of my stories. Some of you will like it. A lot of you won’t. I’m okay with that. 😀reptile girl close up

It’s not techie, but there’s definitely a Sci-Fi slant.

Enjoy.


Inside Out

Fear raged red inside her brain threatening to overtake her logic. Her head pounded, the pressure making it impossible to think. Blinking against the sweat stinging her eyes, she tried to hold onto her humanity. Was she going to explode at any moment or could she tamp down the internal, and infernal, creature for another day?
Crouched against the wall for support, her chest heaved as she struggled for breath. Swallowing hard, she closed her eyes, trying to deal with the terror inside. The terror she’d kept hidden… until tonight.
“Deena? Mom said—,” Devin Skinner rounded the corner and skidded to a halt. His thoughts blanked at seeing his twin sister. “Holy crap.”
Deena Skinner’s eyes flew open, her beautiful blue irises now yellow with black elongated pupils. Around a mouth full of pointed teeth, her deepening voice warned him, “Stay away from me, Devin.”
Oh, no. He should’ve told her. She was his twin. Did he think she’d be spared the agony of the curse he assumed was his alone to bear? By neglecting to confide in her, he’d wronged her grievously. Now he needed to make this right. He only hoped he could.
“Deena. Can you hear me?” Devin waited for a response. None came. “Do you see me?”
Tears streamed down her tormented face as she shook her head at her brother. “Dev. Run. Please. For the love of God… run!”
“I’m not leaving you like this.”
Screaming, Deena threw back her head. The drywall behind her crumbled. Bones cracked and fingernails grew as her hands morphed into claws.
Hearing the noises, their mother called up the stairs, “Are you two all right?”
Devin glanced down the hallway praying she didn’t come up to investigate. She didn’t.
“We’re fine, Mom. I just scared Deena.“ But not half as much as she’s scaring me right now.
“Shh. Deena, listen to me. Concentrate on the sound of my voice.” Devin quietly closed and locked the door. “You can fight this. You’re strong. Channel your human self.”
Between clenched teeth, Deena ground out, “It’s. Gone.”
“No, you’re still human. It’s there… inside. Find it.” Devin watched her panting frame. Her breaths came in short, fast bursts.
He had to do something, but he couldn’t chance leaving her to seek help from those who’d saved him. The others lived across town. Left unattended, Deena could wreak havoc in no time. Not to mention Mom was home.
Their parents had adopted the twins when they were under a year old. That was almost eighteen years ago. Both he and Deena loved them with all their hearts. How were they to know the seemingly normal babies they’d nurtured would grow into this?
“Deena. Mom’s downstairs. I can’t let you hurt her.”
“I don’t want to hurt her.” Her red-rimmed reptilian eyes pleaded with him. Her weak and defeated voice begged him, “Kill me. Devin. Help me and kill me now.”
Devin released a barking laugh. “Ha! As if. Now work with me here, Godzilla. You can harness this.”
Deena’s shoulders began shaking as great sobs racked her aching body. She wasn’t strong, she couldn’t control this. “I can’t.”
If she turned any further, she’d be lost to him. Devin had to make her understand. “See. Your voice was normal that time. You’re learning to deal with your inner beast.”
A fierce snarl escaped her. Yellow eyes flashed at him. In a throaty growl an octave deeper than her usual voice, she answered him, “I’m not. Now. Kill. Me!”
“I’d rather let you kill me. Do you want to kill me, Deena?”
“No,” she whispered. Bowing her head into her clawed hands, she wept.
“If you were truly possessed, you wouldn’t care. Now help me out.” Devin stopped, waiting for Deena to look at him. She nodded. “Take a deep breath.” She inhaled.
“Good.” Devin pushed open the bedroom window, letting in light and life from outside.
“Think about the sunny day. Listen to the birds chirping, the neighbor’s dogs barking, the children laughing and playing in the schoolyard down the street. Concentrate on the world. Smell the clean, crisp air. Think about walking — upright, not ambling like a Neanderthal — down the street, petting the dogs, waving at the neighbors and their kids. Remember how wonderful it feels to be human.”
She could do this. He was her tall, dark and handsome older brother — five minutes older, but still older. She’d try … for him.
 Deena closed her eyes. She focused on the sounds drifting into her room. Drawing a slow breath, she listened with a human heart.
The burning haze in her brain lessened, the throbbing quieted. Exhaling long and deliberate, Deena yearned to be herself again.
Thoughts of life’s pains and pleasures wound their way through her clearing brain. Living hurt, but the tradeoff was the happiness that weaved its way through every human soul a few minutes each day. No other species could boast the wonders of being human. Deena wanted that more than anything.
Opening her eyes — her human eyes — she was greeted by her brother’s heartwarming smile.
“I knew you could do it, tiger.”
Devin backed up to the wall and slid down it, ending on the floor beside his sister. He wrapped an arm around her and hugged her sweat-soaked body to him. Kissing her on the forehead, he confessed, “Boy, do I have a lot of freaky things to tell you.” Glancing behind them, he added, “Man, Mom is going to kill us for denting her wall.”
Exhausted but comforted, Deena closed her eyes and laid her head on her big brother’s broad shoulder. “I’m so blaming you for this, Dev.”

© 2014 Patricia S Gunther. All rights reserved. This document and the information contained herein is the sole property of Patricia S. Gunther.  Any reproduction, including copying and/or publishing, in part or as a whole, is strictly prohibited without written permission from the author.

Getting the Most from Gmail

Gmail logoI’ve had requests to blog about useful Gmail tips and tricks. There are enough I could string this out over weeks. I won’t.

If there’s too much information to digest in one sitting, I suggest taking a tip or two, play with them, and come back later for the rest.


 So, without further ado…

Patti’s Pathways presents:

Getting the most of Gmail header


GMAIL TIP 1:

The Undo Command

We’ve all done it. Typed so fast we’ve enabled hotkeys which highlight an epistle we are preparing and we type over it. Fear not! Things are not as dire as they seem.

One of the best tricks in Gmail is the ability to “undo” a deletion in an email. The Undo command will flip back through your recent activity, including the highlight and the deletion.

To reclaim your epistle, simply right-click in the body of your message.undo


TIP 2:

Gmail Groups

Send frequent emails about the same thing to the same people? Set them as a Gmail group.

 1) Open Contacts (upper left margin).
Gmail ContactsFYI: If Contacts won’t open — there’s a perpetual message of Loading… -or- Still Working… — clear your browser history and/or cookies.

I know. I know. Clearing cookies is a pain in the patootie. Now you have to re-enter all your passwords, but cleaning periodically may be a good thing. Find tips about passwords in my previous blog “Creating the Safest Password” (June 2014).

2) Select New Group at the bottom of the right margin.
New Group


This opens a box asking you to name your new group.

I’ll name this one “TEST”.

You’re thinking, Thank you, Captain Obvious.


3) Click your new group name (Arrow 1), then click the Add icon (Arrow 2), type the first letter of the contact names you want to add to that group. Gmail will autofill your contact names.
Group Name


4) Click Add at the bottom of the group name window and Presto! You’ve added a new contact group.

FYI: To get back to Gmail, go to the top left margin menu again. (Tip 2, Example 1)


TIP 3:

Blind Carbon Copy

Ever receive an email with fifty or more addresses in the To: field? Not cool, huh?

To make your bulk emailing polite and political correct, use Blind Carbon Copy or BCC.

1) Put your email address in the To: field. Yes, you’ll get a copy in your Inbox, but look at the bright side. It won’t be notes from others criticizing your email etiquette.

2) Click BCC: at the right of your message compose box. Now add your recipients behind the BCC.
BCC


3) Type and send your email as usual.

The receiver will see their name in the To: field and yours in the From: field.


 Tip 4:

Replying Without Including Every Thread Comment

Let’s talk about the punishment of viewing every single message in a long reply thread.

Yes, you can stop this. Never knew you had the power, did you?

Unfortunately, there’s no setting in Gmail to turn off every reply in a thread. But…there are workarounds.

Workaround 1:

  • After 1) clicking Reply, 2) press Ctrl + A and 3) simply start typing.

Ctrl + A is a shortcut for “highlight all” (A = all). This deletes the string of thread messages in the body of your reply and keeps only what you now type.

Workaround 2:

  • Enable Quote Selected Text lab.

Whispers: “We’ll talk more about labs later”.

Settings


1) Click the gear icon in the top right corner of your email window.


2) Go to Gmail Settings.


Lab Tab


3) Click Labs tab


Now you should see all the fun Lab options, or as Google calls them “crazy experimental stuff”. Don’t be scared.

We’re looking for this lab. Scroll down to it and enable.Quoted Text


USING THIS LAB: highlight text you wish to reference in the message you’re replying to, select Reply, and your highlighted selection should magically appear in the body of your reply message. You can then type and reference it.

Workaround 3:

  • Turn off Conversation View.

Remember eons ago when your email box didn’t have threads? Yeah, me neither. Trust me. There was a time. You saw every message as an individual email. This was before Conversation View, which groups conversations together by topic.  Turning off CV will only include two emails in your reply —the original email and your reply. Personally, I like CV better —less clutter on a long conversation — but if you don’t, you can turn off Conversation View in a few clicks.

1) Open Gmail Settings (gear at the top right)

 Settings

 2) Under the General tab, about one-third of the way down the page is your Conversation View settings. You can turn them off or on by clicking the appropriate radio button, then saving at the bottom of the page. Conv View


TIP 5:

Task/To-Do List

Did you know Gmail had a Task/To-Do list? Yep, it does. Where? Here.

1) Remember the Contacts list (top left) we looked up before? The Tasks option is directly underneath it.

Gmail Contacts-Tasks

2) When you click Tasks, you’ll see this. Well, kind of. You still need to input your personal To-do’s.

Gmail Task

Gmail will remember your list eternally. Yes, even if you click the X at the top right of the box or log off. You have to manually remove your items through the Actions menu (arrow).


TIP 6:

Desktop Email Notification

A few years ago I purchased a program called Gmail Notifier Pro. It tosses a notice on the lower right corner of my desktop when I receive a new email. It does this for all my email addresses (I have several and I’ve set each to a different color). I love it.

Gmail now offers a version of this free…freefree.  If you’d like to try it, here’s where to find it.

  • Open Settings (top right)

Settings

  • Scroll down to Desktop Notifications and click the radio button in front of New Mail Notifications On.Desktop Notification

Notice the middle option: Important mail notification on? As far as I know Gmail decides what’s important and what’s not. I suggest setting to notify on all new emails, and you decide what’s important.

FYI: It will not notify you of Spam, but it will notify you of promotions you’ve signed up to receive.


 More Talk About LABS:


Labrador Retriever
Not that kind of lab, silly.

Good dog.


What is a Gmail Lab?

These are pre-releases Google is letting you use… for now. Can you say guinea pig?

Their disclaimer reads:  “If you’re going to brave the Labs world, it’s important to keep the following things in mind about these features:

  • They may break at any time.
  • They may disappear temporarily or permanently.
  • They may work so well that they graduate and become regular features.”

Lab Tab


I think Gmail labs are wonderful things. They can be very helpful and are easy to equip. If you see one you want to try, simply click Enable, then Save Changes.


Here are a few I’d recommend.

Great Lab 1:

  • Undo Send – This gives you an option to unsend an email.

If you’ve ever hit Send and thought, “Oh, dang. That wasn’t what I meant to say.” – or- “Oops, forgot to say that.”, this lab is for you.

After it’s Enabled and Saved, your Undo Send lab will give you an option after each email to Undo it.Undo send

When you click Undo, it brings your email back so you can add, delete, or whatever you’d like to do with the original.

NOTE: The default setting for Undo Send is 10 seconds. I changed mine to the maximum — 30 seconds — by going to Settings > General tab, then about 1/4 of the way down the page.

ADDITIONAL CAUTION: The max is only 30 seconds. If you sent a harsh email to the guy who stood you up or to your bff about her failure to tell you she’s dating your ex, there’s probably not enough time to Undo those.

Moral of this: Think — and calm down — before you email. Makes life easier.

Great Lab 2:

  • Canned Response

If you re-send the same something over and over, this is the lab for you.

To use it, type in your email compose box, then highlight it.

Here’s the tricky part: Click at the bottom right of your email window (arrow 1), click on Canned Response, and New Canned Response (arrow 2).

New Canned Response


You’ll get a window that asks you to name your new canned response. I named mine Directions to My House. Of course.

Those are my favorite Gmail Labs. Yours may be different from mine. Check out the entire list. Oh, and if you want to keep up with old or new Gmail labs, visit Gmail’s blog: Official Gmail Blog


 ADDED COOL INFO:

I found this blog on utilizing your Gmail as a business/organizational tool. I don’t know the author, but I appreciate the time it took to put the blog together. Great article. Thanks, Most Epic Stuff!  13 Simple Hacks You Should Know About Gmail


confused smilie
Remember, there’s a lot here to let sink in. Take your time, and play with some of my recommendations.

I think you’ll find one, maybe more, that’ll make your correspondence life easier.

Take care… and thanks for following Patti’s Pathways. 😀


DISCLAIMER: Any and all ideas presented in this blog are solely my own unless otherwise noted. I experience troubles with technology just like any other person, and if I stumble upon a fix or suggestion I feel could benefit others I pass it along. At no time, have I suggested or implied that I hold any degrees or certificates related to computer repair.

I have during my career assembled parts into working computers; done troubleshooting on hardware and software; utilized a great many computer programs and software; designed and updated websites and blogs; as well as created brochures, banners, and flyers.

Adding a Single Playlist to Your iPod

No, your eyesight is fine. I am posting a second post in as many weeks.

When I have troubles with something (or need to figure out a how-to all over again), it’s probably a safe bet more people have this problem than just me.

My challenge this week was adding a single playlist to my iPod. At first blush, iTunes is not that user-friendly. Actually, it’s fairly simple.

It’s time to make sense of the nonsensical. I knew you’d be excited.


A little background and my thoughts: I love music. I don’t have cable tv or a satellite dish —  I did, never used it. When I’m home, music is my constant companion.CD

My music comes from the radio, CD’s, or digital downloads. People work hard making the media that give me energy, inspiration, and joy so I do not condone pirating or bootlegging music, videos and movies, or computer software,

Tip: If you can’t afford or have an aversion to buying music, you can a) use the radio airwaves for free, b) ask for music gift cards at every occasion, and/or c) get a cheap monthly subscription to a legitimate music hosting website.


Now… the reason you came to this blog in the first place: Adding playlists to an iPod.

I’m taking a leap of faith that you know how to get your music from your digital downloads or CD’s into iTunes. That’s the easy part.

ADDING A SINGLE PLAYLIST TO iPOD

mp3 player

1) Plug your iPod into you computer’s USB port.

2) I believe default settings will open iTunes automatically at this point.

If not, you’ll need to locate the iTunes program. Try C:/Program Files or look for an icon on your desktop.

3) In iTunes, double left-click the iPod image in top right corner.

NOTE: Don’t click the up arrow on the right side of the iPod button. This will close your iPod. If you did, simply unplug the iPod’s USB and replug, It will show up again in the same place.

SECOND NOTE: If iTunes is not recognizing your iPod through your PC, reset the iPod connection by holding down the Menu + Center area together until the apple (Apple Icon) shows up on your screen (6-10 seconds). Now your iPod should show up on your PC.ipod plugged in

4) Click on the On This iPod tab. Now you can see what’s on your iPod.On this iPod
5) Click on Add To…

You’ve just opened a window showing what’s in your iTunes Library (left red arrow) and what’s on your iPod (right red arrow). iPod and iTunes Lists
6) Left-click, hold and drag the playlist you wish to add from iTunes and drop into your iPod lists.Drag and Drop

Congrats! You’ve done it! See, there’s a Done button at the top right. 😀

ADDING MOVIES

To add movies is primarily the same as music. The only difference is to choose Movies in the left dropdown iTunes menu instead of Music.

Left dropdown menu

Click Add To…, then Drag and Drop.

ADDING PHOTOS:

iTunes treats photos as completely different creatures. You can’t add a single photo to your iPod photo library. However, you can save a folder (or multiple folders) of photos, add/delete photos within it, and re-sync it to your player when you want to change those photos.

1) Make a folder of photos you want on your iPod.
I named mine “iPod Photos”. Yes, I’m just smart that way.

2) Plug in your iPod,

3) Open your ipod.
iPod plugged in
4) Left-click the Photos tab
ipod photo tab
5) Choose your folder.
Choose folder photo

6) Check Sync Photos From box.

7) Click Apply at the bottom right to tell the software to choose your folder.

8) Click Sync

Voila! Your photos are on you iPod.


I hope this helped answer questions and solve problems you had with iTunes. Now, go enjoy your newly added music, movies and photos. What are you waiting for? Go,

Oh, and thanks for visiting Patti’s Pathways. Y’all come back now, ya’ hear 😉

Helping Kids Understand Finances

I was sorting through articles I’ve kept over the years again and found several on helping kids manage money. Some of these tips were too good not to pass along. Many of them are great for adults, too.


Money Tip 1:dollar sign

I heard this tip on John Tesh’s radio show, Intelligence For Your Life. The tip’s geared toward adults, but could be tweaked for older children, tweens and high schoolers.

  • Instead of one big savings account, open several small accounts, earmarking them for different goals: Car, Computer/Electronics, Vacation, even Nights Out/Party. People who have earmarked savings accounts save 31% more. They have a goal and are excited to work toward it. Thirty-one percent seems an incredible number, but would John Tesh lie?

Money Tip 2:

Some people just aren’t cut out to budget. They are short every month. Plus kids don’t understand the concept yet. Enter The Money Envelope System. I don’t know the original person who came up with this idea, but it’s super.

  • Here’s how MES works:

envelope money1) Take large-sized letter envelopes.

2) Label them. Each monthly bill or priority gets its own envelope.

For adults: Rent, Food, Insurance, Phone, Utilities, etc. For kids: Games/Game Consoles, Bike, Friend Birthdays, etc.

Be sure to Include an envelope for Savings and Entertainment (movie rentals, dinner out, concert tickets, etc.).

3) Place cash from your paycheck/allowance into each envelope to cover that month’s expense. Example: if your rent is $350, $350 in cash goes into the Rent envelope. Don’t touch it for anything else.

MES Tip #1: IMPORTANT: Keep these envelopes somewhere very safe! After all, there’s cash in them.

4) After you’ve paid the month’s bills, any money remaining in any other envelope gets split between savings and entertainment.

5) Deposit the savings immediately. Your extra entertainment funds roll over to the next month to enjoy.

MES Tip #2: Your gas and electricity no doubt fluctuate monthly depending on the temperature. You should probably  leave the Utility envelope out of the savings/entertainment split at the end of the month. The money in it will grow and shrink depending upon the need.

Remember old television show moms who kept a wad of cash in their cookie jars? These envelopes are your cookie jars.Dave Ramsey Envelope System Wallets

Dave Ramsey has great wallets on sale for the money envelope system. I didn’t hear the original idea from him, but stumbled on these while visiting his great site. Dave Ramsey Envelope System Wallet


Money Tip 3:

Next time you give money to a child/grandchild/godchild for a birthcheckbookday or special occasion, split your gift in two.

The article says write two checks: one to the child, one to the charity of the child’s choice.

Personally, I’d give cash to the kid and a check to the charity. Have a  few charity suggestions in mind. Me? I’d suggest Make-A-Wish, March of Dimes, Special Olympics, Wounded Warrior Project, a local homeless mission, and a local animal shelter.

This idea works great for babysitting payments also. Pay the sitter the money they’ve earned and then give them an additional check for the charity of their choice. Or being the great person you are, tell them you’ll send the donation and ask where.

Set a wonderful example for our future charitable givers. It’s important.

Money Tip 4:

Rememmoney treeber when (and how often) your parents use to say, “Money doesn’t grow on trees.” You probably learned that the hard way after you got your first paycheck.

It’s important to talk specifics about money with your child.

  •  Show your child a paycheck. Tell them how you earn money. Explain how taxes are deducted, or savings are automatically deposited each pay period.
  • Show your child a credit card statement. Explain interest and what happens when you can’t pay off the amount charged. Be sure to tell them when it’s appropriate to use credit cards and how to avoid sinking into debt. Tell them they should never let others use their card or know the number.

***Insert here the discussion about why Mommy knows Daddy’s credit card number and uses it a lot…or vice versa.

LAST THOUGHTS ON CHILDREN AND MONEY:

  • Your child should be given a weekly/monthly allowance. Even if it’s only a few dollars. This teaches saving and fiscal responsibility.

I know, I know. I’m sure many congressmen and congresswomen got childhood allowances; I’m just not sure what happened during their college years.

  • Don’t tie your child’s allowance to behavior. You’ll be tempted to removekid piggybankmoney allowance for bad deeds, but don’t. Yes, I wanted to say dirty deeds done dirt cheap, but I refrained. 😉

If you want to charge a quarter for each cuss word or leaving Legos on the floor so Daddy screams in pain during middle of night, give the child an extra few dollars earmarked for that.

Tell them why. Hey, kids are smart. They know you don’t like them cussing or to be screaming in pain during the middle of the night. Also tell them if there’s any money left at the end of a certain time period, it’s theirs to keep.

If it were me, I’d give the extra funds to them in quarters and keep a quarter ‘cussing/bad habit’ jar handy for them to deposit their fines. I’d also reward good behaviors by giving back quarters.

Those are my suggestions. You may use two, one or none of them, but consider the benefits of talking over finances with your kids. It could put them on a path to a sound future.

Have a safe and prosperous week, and thanks for following Patti’s Pathways. 😀


 DISCLAIMER: Any and all ideas presented in this blog are solely my own unless otherwise noted. I experience troubles with technology just like any other person, and if I stumble upon a fix or suggestion I feel could benefit others I pass it along. At no time, have I suggested or implied that I hold any degrees or certificates related to computer repair.

I have during my career assembled parts into working computers; done troubleshooting on hardware and software; utilized a great many computer programs and software; designed and updated websites and blogs; as well as created brochures, banners, and flyers.