Category Archives: Computer Technology

Password Protecting Folders In Windows 8

This post was originally going to be “How to Permission Protect Your Windows 8 Folders” because chatter on the web said there is no way to password-protect folders in Windows 8.

dancer, german femaleSurprise! You can password protect folders in Windows 8. You do this by using a zip program and archiving your special folder. After doing a bunch of dancing around, you’ll get password protected folders and files.

Be forewarned. The choreography sounds complicated, but you’re a good dancer so I think you can follow.

Now… get ready to dance. I’m leading.

Dance Step One:

Create a Restore Point.

In Windows 8 and 8.1 to create a restore point go to Control Panel > Recovery > Configure System Restore. Don’t forget there’s always an uninstall option at Control Panel > Programs if you don’t like a program.

Dance Step Two:

Find a good file archive program. I have WinZip, but the free archiver I tested for my faithful readers is 7-Zip.

What’s a file archive program? A file archiver either 1) compresses information to take up less hard drive or download space, or 2) makes files and folders easier to send between people since they are archived with file content and not a specific file system.


MORE THAN YOU EVER WANTED TO KNOW ABOUT FILE SYSTEMS: Different digital devices use different file systems to store data. Flash drive content is stored differently than CDs/DVDs. Different operating systems also have different file system types. Microsoft/Windows file system (usually FAT or NTFS) is different from the Macintosh/Apple file system (HFS). For the pre-computer crowd, think Dewey Decimal System versus strict alphabetical order.Rumba

Now to toss a watusi step into a rumba dance to confuse you further. File systems are not the same as file extensions (.exe, .doc, .jpg, .zip, .bat, .epub).


Why did I choose 7-Zip to test? Out of 5 stars, it still has a 4- to 4 1/2-star approval rating from users after 8 million downloads at cnet.com. Cnet editors gave the 32-bit a 5-star rating, but didn’t rerate the 64-bit program. I’m using 64-bit with no troubles.

Psst! If you’ve been following this blog, you’ve figured out my favorite program download site is cnet (download.com). I’ve used it for years and have never gotten a virus, plus little or no adware sneaks in with your downloads.

HEADS UP: On download.com — and a lot of other download sites — don’t be confused by paid advertisers on the same page as program downloads. Paid advertiser download buttons are in a box usually with the name of the paid program beside the button.Download 7-zip

In the above example, the top free download is RegClean Pro. The name’s fairly well hidden, but you can find it if you try. The second impersonator for our download is Bitdefender. I’m sure it’s a very nice program, but we don’t want it today. We want 7-Zip.


7-Zip
http://download.cnet.com/7-Zip/3000-2250_4-10045185.html

7-Zip 64-bit
http://download.cnet.com/7-Zip-64-bit/3000-2250_4-10905593.html

After downloading 7-Zip, follow the prompts to install.

Oh good, the band is back to playing our waltz.

How To Password Protect Items in Windows 8

1) Find the folder you wish to password protect.

For demonstration purposes, I made a TEST Test Folderfolder on my desktop. I’d suggest you do the same until you are familiar with how this works. Toss a test.doc or two into your TEST folder. You’ll need something to protect or it doesn’t work. At least, it didn’t for me.

Note on Photos and Clipart: .jpg, .gif, .png, and others save in zip archives, but don’t open. Some premium archiver programs have an image viewer capability. If you don’t have one of those, you can unzip/move the photo to a regular unarchived file/folder to view.

2) Right-click your TEST folder, 3) choose 7-Zip, then 4) Add to archive…7-zip

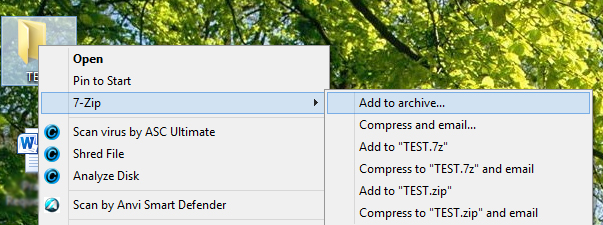
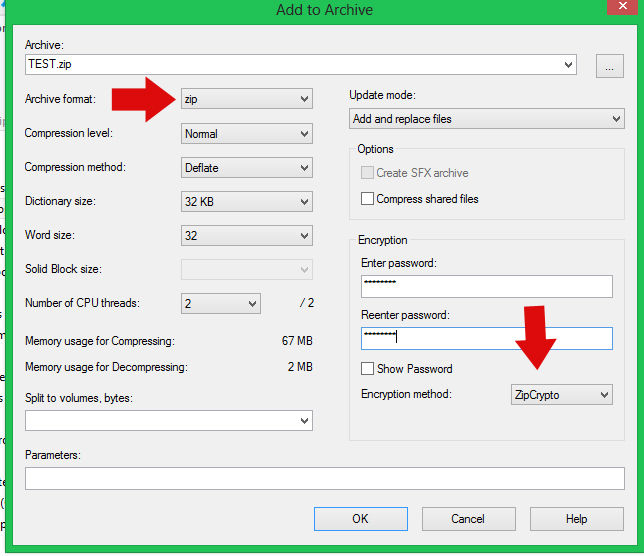
5) Make sure the Archive Format is zip, and the Encryption method is ZipCrypto. This allows someone you’ve given the password to the ability to open this file with any zip program. 6) Enter a password of 8 digits, and 7) Press OK.
Add to archives

8)  Locate the .zip folder you’ve just created.

The easiest way is clicking the Taskbarfolder icon on your task bar, then under Desktop find your TEST folder. You can also use Windows key + X, and search for your .zip folder with the File Explorer.

Your original TEST folder is still there. That’s the one you made first, but not the archived one. To find the archived one, scroll down a little farther. If you see a TEST.7z folder, you archived your folder in 7-Zip format.Test

Did you notice my archived folders show as WinZip files? That’s because WinZip is my default archive program.  My new password protected files open in WinZip also.

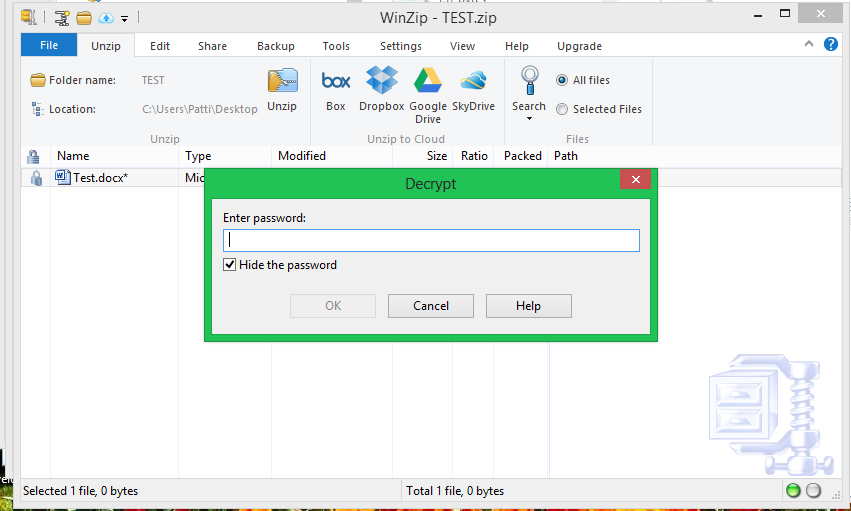
9) Left-click on your TEST.zip folder and you’ll get a prompt to enter a password. That’s the password you just assigned in 7-Zip: Add to Archive. 10) Enter your password.
Password

10) Choose the document in the folder you wish to open/edit. Now you’re free to edit the item as you wish.

FYI: If you don’t close the archived folder, you shouldn’t need to reenter the password to access other documents in that folder.

A WORD ON SAVING YOUR FOLDER:

When you exit your new .zip folder, 7-Zip is so nice, it’ll ask if you want to update it. You do.
7-zip save

WINZIP NOTE: If you’re default program is WinZip, you’ll get this save screen.
Save
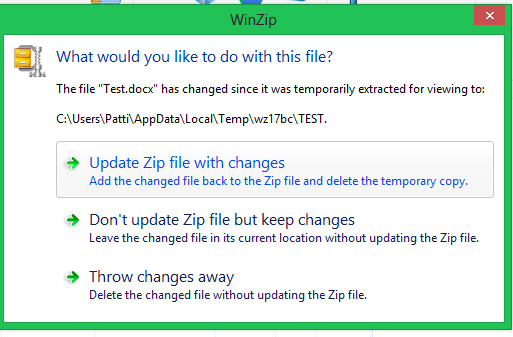
You want the top option. WinZip now asks for another password. It must think an updated document needs an updated password. I use the original pass I set. If you don’t edit the file, WinZip doesn’t ask to update the password.

There. You’re done! You’ve created a new password protected .zip folder, and you’re free to delete your original folder.

I played around for a while before actually deleting any folders. My password protected folders are still working. All seems right in the .zip computing world.


Are there any downsides?

The only downside I see is adding items to your protected .zip folder.

Creating new folders in either 7-Zip or WinZip is easy. Right-click in the protected folder body (or chose the File command at the top bar), then left-click “New Folder” or “Create Folder”.

The tricky step is adding documents or photos within a protected folder in 7-Zip.

Archive programs are made to conserve space or make data more portable, not as a place to create documents, view photos, et cetera.

7-Zip:

Let’s talk about adding items in 7-Zip first.

I will requote the old adage: You get what you pay for. This free program makes it necessary to dance around again to add items.

7-Zip does have a “Create File” option, but for some reason, it doesn’t work for me nor can I find anyone on the forums who succeeded with it. Let me know if it works for you.

To add photos or documents using 7-Zip, they need to be 1) archived first (a new .zip made), then 2) dragged and dropped into your password protected archived folder. Cut and paste aren’t supported.

It might be of greater benefit in 7-Zip to resave old items from your protected folder in a new regular folder with the new items you want to password protect, then rearchive them all.waltz

Why? Each added item equals a new folder. Soon, if you have a lot of super secret stuff, you’ll have oodles of folders to waltz through to find the one you want.

WINZIP:

Adding photos or documents using WinZip is much easier.  1) Create and save your item as usual. 2) Drag and drop it into your password protected Winzip folder. 3) With the document name highlighted, 4) open Tools, and 5) choose Encrypt Zip File.

When it asks a password, continue with the steps you used before to edit and save it. When you close your newly added file, WinZip will password protect it.


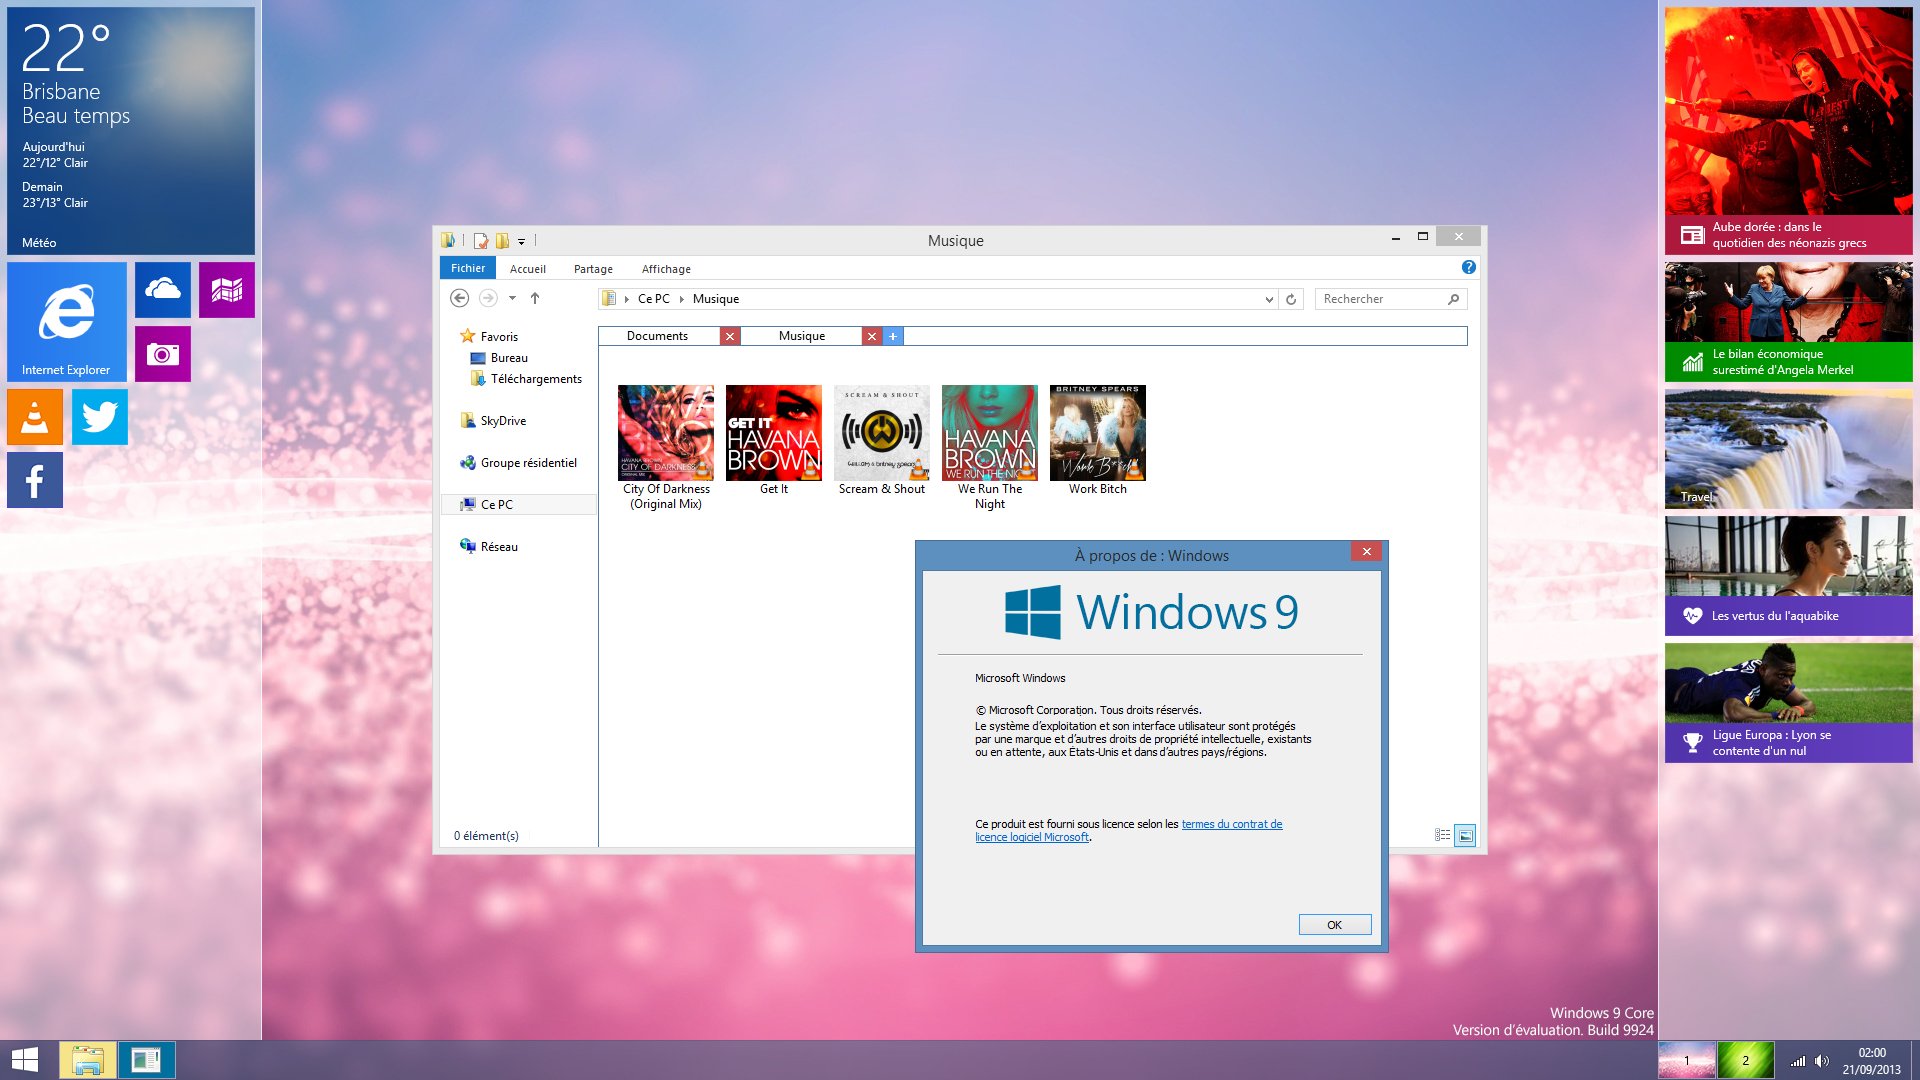
I know this is a lot to process, but if you wish to password protect your data in Windows 8, you must learn the tough routines. And pray Windows 9 allows password protecting files again then upgrade.

You should pat yourself on the back though. hula bear and penguinYou’re a great dance partner. Now sit this next set out and put your feet up, you’ve worked hard.

Have a productive week, and thanks again for following Patti’s Pathways. 😀


Other posts that compliment this one:

Creating the Safest Passwords

On The Threshhold of Windows 9


DISCLAIMER: Any and all ideas presented in this blog are solely my own unless otherwise noted. I experience troubles with technology just like any other person, and if I stumble upon a fix or suggestion I feel could benefit others I pass it along. At no time, have I suggested or implied that I hold any degrees or certificates related to computer repair.

I have during my career assembled parts into working computers; done troubleshooting on hardware and software; utilized a great many computer programs and software; designed and updated websites and blogs; as well as created brochures, banners, and flyers.


How to Spot a Hoax Email

super www womanI  received another hoax email last week. I’m not viewed tenderly by most people who send these. Why? Because I believe it is my charge in life to single-handedly rid the internet of hoax and fake emails. Ka-Pow!

I do this by not forwarding them, and bringing the email status to the attention of the person who forwarded it.

There are at least three problems with this approach.
1) A million other people still forward these thinking they’re true.
2) Haters don’t care as long as the hoax email damages the reputation of their target.
3) Innocent forwarders can be offended.

Hence, the purpose of this blog.

“Gathered together from the cosmic reaches of the universe – here in this great hall of justice – are the most powerful forces of good ever assembled.”

Yep, the Super Friends narrator is talking about you!  Never saw that coming, did ya’?

You’re being recruited by the renown organization A.T. (the Accuracy Team). We, at @, stand for truth, justice, and the cyber highway.


The A.T. Not-so-super-secret Training Manual

Spotting hoax emails isn’t hard if you know what to look for. About 90% of the emails I choose to verify turn out to be hoaxes. The 10% that aren’t usually surprise me.

Some hoaxes are merely annoying while others can cause financial hardships or worse.

What do I look for in a hoax email or photo?

  • Does the email picture or quote a person or business in the public eye?

    emailAll hoax emails refer to famous people or entities: politicians, tv/movie/radio personalities, famous athletes, or major corporations.

How many hoax emails circulate with quotes from Mildred Smith of Poughkeepsie, N.Y. or from Brad’s Lawn Service? And if they did, who would care?

  • Is the person mentioned smart enough to foresee the consequences of performing said appalling action?

Example One: The below photo is circulating. The claim is the Obamas were caught blatantly disrespecting our wonderful country by using their left hands during [pledge of allegiance, national anthem, add your own].

Since I know neither one of the Obamas is stupid, and both smart enough not to want the massive public outcry this shameless diss would bring — hey, it was his first term in office — I decided to verify the info before forwarding.

My investigation uncovered the truth. The picture is Photoshopped. The creator did a bang-up job by adding wedding rings and switching the buttons on the President’s coat. He just forgot one teensy, glaring item: marines always wear medals on the left chest. It’s protocol. There’s an entire chapter devoted to how to, where to, and when to wear medals in the marine handbook.obamas_lh_flag_salute

I didn’t find who took the original, but it ran in Newsday and was taken during the playing of Taps on September 11, 2009.

In all fairness, I’ll include a hoax photo from our last Republican president. Opponents on both sides of the political machine try so hard to discredit one another it’s embarrassing.

This photo is also a product of Photoshop. The book is America: A Patriotic Primer by Lynne Cheney. Notice the back cover of the book G.W. is holding? The black blob (red arrow) — no clue what it is — is on the wrong side if the book were flipped around. It’s located opposite on the book the girl is reading.bushbook
I tried to find the original of the back cover photo (Lynne Cheney surround by children, some with flags) to identify the black blob, but I had no luck.

The original of this is an Associated Press photo.

Today’s tip to haters? If you digitally alter photos, don’t use pictures from big name media outlets. They’re so easy to debunk.

  • Does the email include the words “This is NOT a hoax.” or “This is REAL!”?

Have you seen that Bill Gates is giving away $5,000 to anyone who shares a certain picture of him on Facebook? “IT IS FOR REAL”. It’s not, and he’s not.


The above types of hoaxes are annoying, fill your Inbox, clog the Internet, and waste the time of millions of people.

But do they cause lasting hardships for people? Probably not. The targets are people who are accustomed to being stalked and slammed by the media so I’m sure email hoaxes don’t mean a great deal to them.

Actually, this week elites are busy worrying about iCloud hackings. This is exactly why my blog post How Secure is Dropbox? cautions people against uploading important or personal information onto a cloud service. If you’re not comfortable with the data or photos falling into the hands of unscrupulous people, don’t share them there.


Now, pay attention.

Up to this point we’ve talked about irritations. Our conversation is now turning very serious.

Danger

There are emails hoaxes which fall under a category I like to call “felonies”. They are life-altering and some have major financial consequences.

Email Hoaxes that can seriously cost you.

  • Emails that ask for a credit card numbers.

You’re too smart to fall for that, right? How about the one below? It’s a complete hoax. Looks legit, doesn’t it? It’s easy to copy and paste a logo into a mock-up business mailing. Don’t fall for it.
021604-yahoo-phishing-scam

IMPORTANT WARNING: Notice you can “update your credit card information by clicking here” That “here” takes you to a bogus website setup for the specific purpose of stealing your credit card information.

  • Emails that ask for cash to get something.

If they didn’t cost innocent people their hard-earned savings, I’d find some of these emails hilarious.

An example is the email featuring a letter from the FBI legitimizing the Nigerian Minister of Finance’s offer of $800,000 on an ATM card for wiring $550 USD to an account. Doh!

NOTE: Anything from a country you’ve never visited, like Nigeria or Singapore, is probably a scam unless the person asking is a long-time friend or associate. But please, be equally cautious if you do know the Nigerian Minister of Finance.

  • Emails that ask for personal information.

No legitimate organization will EVER ask for your social security number, bank account number, or PIN number via email.

  • Emails that give you a clickable link.

Remember the Yahoo! scam email above with the “click here” option? Cyber thieves put their blood, sweat, and tears into their endeavors. If only a small percentage of their emails succeed, they’ve made tens of thousands of dollars illegally.

Capital OneCapital One has a great section on internet security. Thanks, Capital One!

Capital One Security Education Center  The Fraud Prevention Topic item two on phishing has great advice on spotting bogus emails.


Now that you know how to spot them, let’s talk about authenticating scam/hoax emails.

How do I verify hoax emails?

You’ve received an email you think is a hoax. How do you know for sure?

One word: Google. Search engines are a beautiful thing.

In Example One above, I searched something like “Obama left-handed pledge?”. You can add “hoax” or “fake” to the search if you’d like. You should quickly find enough research to know if something is a hoax.

WORD OF CAUTION: Remember, everyone has an agenda. Never rely on one site’s opinion unless the fraud is so obvious common sense dictates no further research is required. The marine medal’s or the book cover in the above examples pretty much made further investigation unnecessary. Those alone proved the photos fake.

I suggest using one (or more) ultra-liberal, and one (or more) uber-conservative sites for each verification, if needed.


What to do if you’re being targeted by scammers.

If you think you’re the target of internet thieves, all email providers have “Report Phishing” functions. They take this very seriously.

Gmail Report Phishing


In Gmail. 1) Open the email, 2) left-click the options menu (little arrowhead) on the very top right and 3) select “Report phishing”.


In Outlook, there is a “Junk” tab at the top.

Outlook Phishing

If you use a different email program, search “Report phishing” in their Help or “[Program name] report phishing”on the Internet.  You should find what you need to file a report.


PARTING THOUGHTS:

With politicians, Hollywood elites, and athletes doing dumb things daily,  we certainly don’t need to make up stuff or enable others who do.SuperBusinessman

Scams are everywhere. Not only in emails, but on social media sites.

Be cautious and do your part. Use your newly acquired superhero powers to help make the cyber highway a safer place to travel for everyone.

Have a great week, and thanks for visiting Patti’s Pathways. 😀


DISCLAIMER: Any and all ideas presented in this blog are solely my own unless otherwise noted. I experience troubles with technology just like any other person, and if I stumble upon a fix or suggestion I feel could benefit others I pass it along. At no time, have I suggested or implied that I hold any degrees or certificates related to computer repair.

I have during my career assembled parts into working computers; done troubleshooting on hardware and software; utilized a great many computer programs and software; designed and updated websites and blogs; as well as created brochures, banners, and flyers.

On the Threshhold of Windows 9

Toward the end of September — September 30 to be exact — I’ll be spying on computer world news. Spy with newspaper

Intelligence reports mark this date as a likely press event to unveil Windows 9 (code-name: Threshhold).

In April 2014, attendees at the Build conference were treated to a sneak peek of Threshhold. Rollout date is currently set for April 2015.

Why the hurry? Windows 8 just debuted. Therein lies the problem.

Windows 8 has received a less than stellar reputation. For the general computing public, Windows 8 is too heavy on apps and too light on desktop functionality. Honestly, I like Windows 8 —  my previous OS was Vista, the OS that almost single-handedly brought down the free world. I’ve also not upgraded to 8.1 because of a number of sketchy reviews from people who did.

I’m praying Microsoft’s trend of great OS – poor OS – great OS – poor OS continues making Windows 9 the next XP or 7. Sometimes I wonder if Microsoft releases bad OS’s on purpose so the good ones look phenomenal by comparison. I know, I know. What happened to my glass-half-full mentality? It’s still here, just undercover. 😉


On the Threshhold of Windows 9

I’ve tracked down a few new features of Windows 9. Beware, nothing is one hundred percent set in concrete gumshoes.

Changes/features may or may not be universal across desktops, laptops, and tablets (we hope not); and Microsoft could tweak anything to insure the best performance for each specific hardware device (we hope so).

NEW WINDOWS 9 FEATURES:

    • Start menu is back, just when we Windows 8 users figured out how to live without it. It’s probably like a bicycle: once you can learn, you never forget.
    • This is a leaked printscreen of the new Start menu.Windows_9_Start_Menu_Neowin


  • Removal of the Charms bar.side commands

Remember the Windows 8 bar that opens when you hover over the right top or bottom of your desktop? Yep, that’s the Charms bar. Honestly, it’s more of an Apple-wanna-be bar. It’s not coming back. At least not in Windows 9.

  • Metro apps are still a part of Windows 9, but in  a much lesser capacity… or so it’s said. Some of the leaked screenshots make me wonder about the reliability of the operatives. They’re reporting Window 9 Apps will open in small desktop windows.

What’s a metro app?  It’s all those little box programs that show up on the Windows 8 Start Screen, including the ones you added from the App Store.  Metro apps are fantastic if you have a touch screen tablet, but — as everyone found out with Windows 8 — not very user-friendly for keyboard computers.

  • Greater ability to personalize.Windows-9 Personalize


  •  Cortana — Microsoft’s voice-based assistant currently available on Windows Phone only — could be part of Windows 9.

Don’t panic. You’ll probably be given the choice to turn her off and on. And guys? Enjoy it. You may never get a chance to silence a woman this easily again.

  • Possibility the new Windows OS will be subscription-based.

Rumors are flying about the price. Software watchers vary in opinion of the cost from Windows 9 being free or negligible to subscription-based. Remember Office 365 priced at $100? It’s a subscription-based MS program. You get to use it for 365 days. When your subscriptions runs out — you guessed it — you have to pay again. Personally $100 annually for an upgrade is way to expensive for my taste. If Microsoft charges a subscription fee anywhere close to Office 365, and Windows 9 doesn’t perform up to expectations, this could start the next Cold War with OS defections inevitable.

I’ll leave you with a few more leaked screenshots of Windows 9. Enjoy.

Thanks again for following Patti’s Pathways. 😀


Windows 9 Desktop:
Windows-9-Design-Mixes-the-Desktop-and-the-Modern-UI-Screenshot-385249-2


Outlook:
Outlook-Windows-9


DISCLAIMER: Any and all ideas presented in this blog are solely my own unless otherwise noted. I experience troubles with technology just like any other person, and if I stumble upon a fix or suggestion I feel could benefit others I pass it along. At no time, have I suggested or implied that I hold any degrees or certificates related to computer repair.

I have during my career assembled parts into working computers; done troubleshooting on hardware and software; utilized a great many computer programs and software; designed and updated websites and blogs; as well as created brochures, banners, and flyers.

Scanning Without Extra Program Downloads

Welcome to a blog for the everyday techie. Although, there are times intermediate to advanced users can benefit (i.e. Finally, A Fix for Windows 8 OpenGL Error).Printer

Today, we’re talking specifically about scanning or printing without the extra software supplied with your hardware.

Why? Less miscellaneous computer programs means less clutter which increases efficiency, not to mention lessens lag and frees up computer memory. Windows operating systems have a plethora of drivers and functions that make those additional programs unnecessary.

But the big reason I avoid installing pre-packaged software is there are stealth (a.k.a. sneaky backdoor) programs that install with your new hardware drivers. Yep, they’re on digital downloads, but also on the disks included. We’ll cover those another week: Spotting Pesky Add-on Programs You’ll Never Need.

Today’s hint works for printers/scanners, cameras, or any usable device that shows up in your Windows Control Panel.


How to Scan Using Only Windows

I have a HP printer/scanner/fax machine. Yes, it’s ancient, but it still works so I keep it around. Since I don’t want to deal with the tag-along programs (technical terms are “crapware” or “junkware”. I’m not kidding), I initiate it through Windows.

If there are features you want beyond barebones — ink levels come to mind — you’ll need to download the program that comes with the hardware. We’ll cover how to choose the features you need vs. the extra garbage in another blog.

NOTE: I use Windows 8 so finding Devices and Printers through Control Panel may be a bit different for you if you use Windows 7 — the last good Windows Operating System (OS). There is a new Windows OS on the horizon. I’ll tell you about that next week. 🙂


1) Plug the printer USB into the computer if it’s not already. Turn on the printer.

Windows now recognizes there’s a device attached… we hope.

2) Open Control Panel.

I use the Windows key + X.
windows-keysmall


In Windows 8, the Windows key + X gives me this:
Control Panel

 -OR-

You can also access the Control Panel from the Settings menu (hover over the top/bottom right corners of your screen). Click Settings at the bottom.
Setttings Shortened


-OR-

You can access it by typing “control panel” in the application search area. Hover over top/bottom right of your screen, click Search and type in your request.
Control Panel-App

FYI: In Windows 7, you can simply open your Start menu and in the right column is your Control Panel.

Where were we? Oh yes, initializing your printer/scanner without installing the included programs.

3) In Control Panel, click Devices and Printers.Devices and Printers


4) Scroll down. Your printer icons are at the bottom (Arrow 1). The printer with the green check below is your default printer.
Devices and Printers with arrows.

What’s Arrow 2? Arrow 2 is where other devices, like cameras, show up. If you don’t find the device you are looking for there, you can Add a Device (Box 3).

FYI: The squiggly lines in the middle is the area any device allowed on your home network shows up. I have twelve or so listed, even people who visit four times a year show up. Yes, the inactive ones can be hidden, but one must jump through hoops and mess with the computer registry. I Just scroll past them. If they really bother you, search “Hide Inactive Multimedia Devices” on the internet for instructions. After reading the instructions, I’m fairly confident you’ll scroll past the multimedia icons also.

5) Click the printer you’re using for the project/letter/whatever you’re scanning.

6) When the next window opens, choose Scan a Document or Picture.
scanner


7)
The New Scan window opens.

Here’s where you create different profiles for items you’d like to scan. Notice mine. I have Photo which is higher resolution in color and Documents with less resolution in grayscale. scanner profiles


You can also choose Manage Scan Profiles from the Printer/Scanner window. You’ll get a different looking window, but with the same editing options as the New Scan window.scan profile


A third way to access Scanner Profile is by right clicking on your printer icon under Devices and Printers (see below). Ninth option down on the menu is Scan Profiles. NOTE: Right above Scanner Profile is a Start Scan command. Yep, you can use that to take you to the New Scan window.Right Click on Printer


Bingo! You are a scanning-without-any-added-programs pro.Thumbs up

What? You don’t feel like a scanner pro?

There’s a lot of information here. Grab a cup of tea, check your tweets or Facebook, and come back later to reread this huge amount of material.

Remember some of these steps are duplicates. Simply different routes to get the same result. Pick the one you like best and is easiest for you to remember.

 ADDED TIP:

I’ve got a secret to show you. How to change the default folder where your pictures/documents/music land.

1) Go to your Libraries folder. I access mine through the file folder icon on the quick launch bar at the bottom of my Desktop.

Alternate ways to get to your Libraries folder: Windows key+X > File Explorer -OR- Windows key+E.

Psst1
2) Right click on any of the Libraries folder icons to access Properties. We’re talking about photos so we’ll use Pictures for our example, but you can change where to store your documents, music, or videos also.
LIbraries


3) 
Select Add, then select the folder you wish to store your photos in.Picture Properties

Your chosen folder will now show up in the Picture Properties menu. I have a folder I send pictures to then move within my photo folders (e.g. Holidays, Family, Cartoons, etc.)

4) Click the new folder added, then 5) Apply, and 6) Set Save Location (middle left).Set Save Location


FYI: See the P:\Photos folder? P is for Patti, and I’ve partitioned my harddrive so I can save documents and photos to a location that won’t get reformatted if Windows takes a dive and I have to reinstall. That’s my safety partition until I find time to save my files to an external harddrive or flashdrive.

What? You want to know how to partition your harddrive. That’s another blog. 🙂


If you followed the steps above, you’re done changing where your pictures will save from your devices. Neat trick, huh?

Well, have a super day and happy scanning! And, thanks for visiting Patti’s Pathways. 😀


DISCLAIMER: Any and all ideas presented in this blog are solely my own unless otherwise noted. I experience troubles with technology just like any other person, and if I stumble upon a fix or suggestion I feel could benefit others I pass it along. At no time, have I suggested or implied that I hold any degrees or certificates related to computer repair.

I have during my career assembled parts into working computers; done troubleshooting on hardware and software; utilized a great many computer programs and software; designed and updated websites and blogs; as well as created brochures, banners, and flyers.

Getting the Most from Gmail

Gmail logoI’ve had requests to blog about useful Gmail tips and tricks. There are enough I could string this out over weeks. I won’t.

If there’s too much information to digest in one sitting, I suggest taking a tip or two, play with them, and come back later for the rest.


 So, without further ado…

Patti’s Pathways presents:

Getting the most of Gmail header


GMAIL TIP 1:

The Undo Command

We’ve all done it. Typed so fast we’ve enabled hotkeys which highlight an epistle we are preparing and we type over it. Fear not! Things are not as dire as they seem.

One of the best tricks in Gmail is the ability to “undo” a deletion in an email. The Undo command will flip back through your recent activity, including the highlight and the deletion.

To reclaim your epistle, simply right-click in the body of your message.undo


TIP 2:

Gmail Groups

Send frequent emails about the same thing to the same people? Set them as a Gmail group.

 1) Open Contacts (upper left margin).
Gmail ContactsFYI: If Contacts won’t open — there’s a perpetual message of Loading… -or- Still Working… — clear your browser history and/or cookies.

I know. I know. Clearing cookies is a pain in the patootie. Now you have to re-enter all your passwords, but cleaning periodically may be a good thing. Find tips about passwords in my previous blog “Creating the Safest Password” (June 2014).

2) Select New Group at the bottom of the right margin.
New Group


This opens a box asking you to name your new group.

I’ll name this one “TEST”.

You’re thinking, Thank you, Captain Obvious.


3) Click your new group name (Arrow 1), then click the Add icon (Arrow 2), type the first letter of the contact names you want to add to that group. Gmail will autofill your contact names.
Group Name


4) Click Add at the bottom of the group name window and Presto! You’ve added a new contact group.

FYI: To get back to Gmail, go to the top left margin menu again. (Tip 2, Example 1)


TIP 3:

Blind Carbon Copy

Ever receive an email with fifty or more addresses in the To: field? Not cool, huh?

To make your bulk emailing polite and political correct, use Blind Carbon Copy or BCC.

1) Put your email address in the To: field. Yes, you’ll get a copy in your Inbox, but look at the bright side. It won’t be notes from others criticizing your email etiquette.

2) Click BCC: at the right of your message compose box. Now add your recipients behind the BCC.
BCC


3) Type and send your email as usual.

The receiver will see their name in the To: field and yours in the From: field.


 Tip 4:

Replying Without Including Every Thread Comment

Let’s talk about the punishment of viewing every single message in a long reply thread.

Yes, you can stop this. Never knew you had the power, did you?

Unfortunately, there’s no setting in Gmail to turn off every reply in a thread. But…there are workarounds.

Workaround 1:

  • After 1) clicking Reply, 2) press Ctrl + A and 3) simply start typing.

Ctrl + A is a shortcut for “highlight all” (A = all). This deletes the string of thread messages in the body of your reply and keeps only what you now type.

Workaround 2:

  • Enable Quote Selected Text lab.

Whispers: “We’ll talk more about labs later”.

Settings


1) Click the gear icon in the top right corner of your email window.


2) Go to Gmail Settings.


Lab Tab


3) Click Labs tab


Now you should see all the fun Lab options, or as Google calls them “crazy experimental stuff”. Don’t be scared.

We’re looking for this lab. Scroll down to it and enable.Quoted Text


USING THIS LAB: highlight text you wish to reference in the message you’re replying to, select Reply, and your highlighted selection should magically appear in the body of your reply message. You can then type and reference it.

Workaround 3:

  • Turn off Conversation View.

Remember eons ago when your email box didn’t have threads? Yeah, me neither. Trust me. There was a time. You saw every message as an individual email. This was before Conversation View, which groups conversations together by topic.  Turning off CV will only include two emails in your reply —the original email and your reply. Personally, I like CV better —less clutter on a long conversation — but if you don’t, you can turn off Conversation View in a few clicks.

1) Open Gmail Settings (gear at the top right)

 Settings

 2) Under the General tab, about one-third of the way down the page is your Conversation View settings. You can turn them off or on by clicking the appropriate radio button, then saving at the bottom of the page. Conv View


TIP 5:

Task/To-Do List

Did you know Gmail had a Task/To-Do list? Yep, it does. Where? Here.

1) Remember the Contacts list (top left) we looked up before? The Tasks option is directly underneath it.

Gmail Contacts-Tasks

2) When you click Tasks, you’ll see this. Well, kind of. You still need to input your personal To-do’s.

Gmail Task

Gmail will remember your list eternally. Yes, even if you click the X at the top right of the box or log off. You have to manually remove your items through the Actions menu (arrow).


TIP 6:

Desktop Email Notification

A few years ago I purchased a program called Gmail Notifier Pro. It tosses a notice on the lower right corner of my desktop when I receive a new email. It does this for all my email addresses (I have several and I’ve set each to a different color). I love it.

Gmail now offers a version of this free…freefree.  If you’d like to try it, here’s where to find it.

  • Open Settings (top right)

Settings

  • Scroll down to Desktop Notifications and click the radio button in front of New Mail Notifications On.Desktop Notification

Notice the middle option: Important mail notification on? As far as I know Gmail decides what’s important and what’s not. I suggest setting to notify on all new emails, and you decide what’s important.

FYI: It will not notify you of Spam, but it will notify you of promotions you’ve signed up to receive.


 More Talk About LABS:


Labrador Retriever
Not that kind of lab, silly.

Good dog.


What is a Gmail Lab?

These are pre-releases Google is letting you use… for now. Can you say guinea pig?

Their disclaimer reads:  “If you’re going to brave the Labs world, it’s important to keep the following things in mind about these features:

  • They may break at any time.
  • They may disappear temporarily or permanently.
  • They may work so well that they graduate and become regular features.”

Lab Tab


I think Gmail labs are wonderful things. They can be very helpful and are easy to equip. If you see one you want to try, simply click Enable, then Save Changes.


Here are a few I’d recommend.

Great Lab 1:

  • Undo Send – This gives you an option to unsend an email.

If you’ve ever hit Send and thought, “Oh, dang. That wasn’t what I meant to say.” – or- “Oops, forgot to say that.”, this lab is for you.

After it’s Enabled and Saved, your Undo Send lab will give you an option after each email to Undo it.Undo send

When you click Undo, it brings your email back so you can add, delete, or whatever you’d like to do with the original.

NOTE: The default setting for Undo Send is 10 seconds. I changed mine to the maximum — 30 seconds — by going to Settings > General tab, then about 1/4 of the way down the page.

ADDITIONAL CAUTION: The max is only 30 seconds. If you sent a harsh email to the guy who stood you up or to your bff about her failure to tell you she’s dating your ex, there’s probably not enough time to Undo those.

Moral of this: Think — and calm down — before you email. Makes life easier.

Great Lab 2:

  • Canned Response

If you re-send the same something over and over, this is the lab for you.

To use it, type in your email compose box, then highlight it.

Here’s the tricky part: Click at the bottom right of your email window (arrow 1), click on Canned Response, and New Canned Response (arrow 2).

New Canned Response


You’ll get a window that asks you to name your new canned response. I named mine Directions to My House. Of course.

Those are my favorite Gmail Labs. Yours may be different from mine. Check out the entire list. Oh, and if you want to keep up with old or new Gmail labs, visit Gmail’s blog: Official Gmail Blog


 ADDED COOL INFO:

I found this blog on utilizing your Gmail as a business/organizational tool. I don’t know the author, but I appreciate the time it took to put the blog together. Great article. Thanks, Most Epic Stuff!  13 Simple Hacks You Should Know About Gmail


confused smilie
Remember, there’s a lot here to let sink in. Take your time, and play with some of my recommendations.

I think you’ll find one, maybe more, that’ll make your correspondence life easier.

Take care… and thanks for following Patti’s Pathways. 😀


DISCLAIMER: Any and all ideas presented in this blog are solely my own unless otherwise noted. I experience troubles with technology just like any other person, and if I stumble upon a fix or suggestion I feel could benefit others I pass it along. At no time, have I suggested or implied that I hold any degrees or certificates related to computer repair.

I have during my career assembled parts into working computers; done troubleshooting on hardware and software; utilized a great many computer programs and software; designed and updated websites and blogs; as well as created brochures, banners, and flyers.

Adding a Single Playlist to Your iPod

No, your eyesight is fine. I am posting a second post in as many weeks.

When I have troubles with something (or need to figure out a how-to all over again), it’s probably a safe bet more people have this problem than just me.

My challenge this week was adding a single playlist to my iPod. At first blush, iTunes is not that user-friendly. Actually, it’s fairly simple.

It’s time to make sense of the nonsensical. I knew you’d be excited.


A little background and my thoughts: I love music. I don’t have cable tv or a satellite dish —  I did, never used it. When I’m home, music is my constant companion.CD

My music comes from the radio, CD’s, or digital downloads. People work hard making the media that give me energy, inspiration, and joy so I do not condone pirating or bootlegging music, videos and movies, or computer software,

Tip: If you can’t afford or have an aversion to buying music, you can a) use the radio airwaves for free, b) ask for music gift cards at every occasion, and/or c) get a cheap monthly subscription to a legitimate music hosting website.


Now… the reason you came to this blog in the first place: Adding playlists to an iPod.

I’m taking a leap of faith that you know how to get your music from your digital downloads or CD’s into iTunes. That’s the easy part.

ADDING A SINGLE PLAYLIST TO iPOD

mp3 player

1) Plug your iPod into you computer’s USB port.

2) I believe default settings will open iTunes automatically at this point.

If not, you’ll need to locate the iTunes program. Try C:/Program Files or look for an icon on your desktop.

3) In iTunes, double left-click the iPod image in top right corner.

NOTE: Don’t click the up arrow on the right side of the iPod button. This will close your iPod. If you did, simply unplug the iPod’s USB and replug, It will show up again in the same place.

SECOND NOTE: If iTunes is not recognizing your iPod through your PC, reset the iPod connection by holding down the Menu + Center area together until the apple (Apple Icon) shows up on your screen (6-10 seconds). Now your iPod should show up on your PC.ipod plugged in

4) Click on the On This iPod tab. Now you can see what’s on your iPod.On this iPod
5) Click on Add To…

You’ve just opened a window showing what’s in your iTunes Library (left red arrow) and what’s on your iPod (right red arrow). iPod and iTunes Lists
6) Left-click, hold and drag the playlist you wish to add from iTunes and drop into your iPod lists.Drag and Drop

Congrats! You’ve done it! See, there’s a Done button at the top right. 😀

ADDING MOVIES

To add movies is primarily the same as music. The only difference is to choose Movies in the left dropdown iTunes menu instead of Music.

Left dropdown menu

Click Add To…, then Drag and Drop.

ADDING PHOTOS:

iTunes treats photos as completely different creatures. You can’t add a single photo to your iPod photo library. However, you can save a folder (or multiple folders) of photos, add/delete photos within it, and re-sync it to your player when you want to change those photos.

1) Make a folder of photos you want on your iPod.
I named mine “iPod Photos”. Yes, I’m just smart that way.

2) Plug in your iPod,

3) Open your ipod.
iPod plugged in
4) Left-click the Photos tab
ipod photo tab
5) Choose your folder.
Choose folder photo

6) Check Sync Photos From box.

7) Click Apply at the bottom right to tell the software to choose your folder.

8) Click Sync

Voila! Your photos are on you iPod.


I hope this helped answer questions and solve problems you had with iTunes. Now, go enjoy your newly added music, movies and photos. What are you waiting for? Go,

Oh, and thanks for visiting Patti’s Pathways. Y’all come back now, ya’ hear 😉

How Secure is Dropbox?

I was invited to Dropbox many, many months ago. I scanned info about it and decided the security risk might not be worth the free membership. I didn’t need it at the time so I shoved it into the recesses of my cluttered little mind.

Recently, I wished to download a free ebook. It comes Dropboxto me via Dropbox.

Now I had a decision to make. Did I pay $10 for the ebook or did I take the plunge and download Dropbox?

I downloaded Dropbox.


My first concern with Dropbox was at sign up. Their Terms Of Service shot me in the face at pointblank range.

“When you use our Services, you provide us with things like your files, content, email messages, contacts and so on (“Your Stuff”).”

Whoa. Hold on, buddy. I’m providing you with my files? How many of my files? I’m providing you with content? What kind of content and how much of it? The list of questions went on and on.

I was not letting Dropbox, or anyone else, get the drop on me. It was notcowboy hat rifling through my confidential files. I bank online, I dabble in the stock market online, and more.

It was time to saddle up and investigate.


Is Dropbox Secure?

My first order of business was to figure out what exactly Dropbox did.

Dropbox is a server that houses whatever you save to it — or anyone else saves to it — for later use by you or anyone you want to share “Your Stuff” with.

Okie dokie. That’s fine. But the elephant — or Clydesdale since I’m on an American West theme today — in the room is how deeply into my computer can an install of Dropbox dig? And could the Dropbox desktop program installed on my computer access my files without my permission?

My first clues are in Dropbox’s Privacy Policy.

1)  “If you give us access to your contacts, we’ll store those contacts on our servers for you to use.”

“If you give us access” calmed me. It told me unless I was an idiot and uploaded something, they couldn’t access it.

FYI: This quote refers to the option they give you to upload your contact list. You can; I didn’t.

2) Dropbox will legally protect my data the same if “… it’s stored on our services or on [my] home computer’s hard drive.”

This just told me Dropbox can’t access my hard drive. Only the files I choose to upload to their site. But I am gambling on the fact they have no security holes allowing unauthorized people to rustle information off my computer’s hard drive.

3) “Dropbox uses certain trusted third parties …. These third parties will access your information only to perform tasks on our behalf … “

clock with wingsI don’t have time to check out Dropbox’s trusted third parties. I am taking a leap of faith here, and praying they’d pass muster with me.

4) Dropbox also says I can — not they will — give third parties access to my info and Dropbox account. They mean third-party apps I choose to use with Dropbox.

5) Dropbox says they keep my information safe with “two-factor authentication, encryption of files at rest, and alerts when new devices and apps are linked to [my] account.”

I am very happy with the latter two statements. The first? Not so much. I pay per text received or sent.

I know what you’re thinking, We’re taking piggy banktechnology advice from a woman who has no keypad on her phone?

My personal economic philosophy is pretty much use what you have as long as it’s cost-effective, getting the job done and repairable. When it’s not, it’s time to upgrade.

6)  Dropbox’s Terms of Service include: “We need your permission to do things like hosting Your Stuff, backing it up, and sharing it.”

This tells me since my permission is needed to do things their site is designed to do, they won’t be doing anything their site isn’t designed to do …unless I give them permission.

Would I recommend Dropbox?

For some things, I would.

Dropbox seems a God-send for business people who work away from the office, and for business teams or students working on projects without the ability or need to meet frequently.

Dropbox allows a person invited to view a file to edit it also. FYI: Dropbox is working on a Read Only business option.

Any downside?

Besides security issues — I know, I know. Dropbox says they’re as secure as your bank. I’m not buying it  — the only downside I foresee is account/file maintenance.

  • Any file edited on Dropbox must be downloaded and resaved by each participant who wants/needs a final copy.
  • Once a project is finished, and all the participants have resaved the product data, any Dropbox file should be deleted and cleared.

I would never use Dropbox to back up my hard drive/files and folders. There are safer and better choices for that.

Other Cautions and Concerns:

  • Early on Dropbox was not the safest cloud to float data on. But neither were a lot of others. Recently, mostly in 2014, Dropbox has dealt with issues and strengthened their security after easy infiltration by independent security researchers and the bad press that generated. I would still never use Dropbox to convey sensitive information.
  • If you think urgent security updates, changes, or notifications will be sent to you via email by Dropbox, you thought wrong. From what I’ve read, most of Dropbox’s important security explanations and/or information is only posted on their blog. You can access it at the bottom of Dropbox’s website.
  • Dropbox still seems nosey to me. Its memory banks retain things like my phone number and physical address.
  • Dropbox does have a policy titled Government Request Principals. Users rights seem to be first and foremost in Dropbox’s mind when data is requested by government entities, and I appreciate that.
  • Their encryption is server-side, not client-side. Meaning the key codes are stored along with your data on their servers. So if the data is lost to hackers, dishonest employees, etc. so is the information to decode it. 😦

IMPORTANT REMINDERS AND WARNINGS:

  •  It’s the user’s responsiblity not to post/share files that could at any time potentially fall into the wrong hands. These would include things like your personal income tax returns, your bank statements, licenses, etc.
  • It’s always a good idea to log out of social media sites and other online sites (Dropbox included) that hold your personal information. Yes, I know it’s much easier to just leave them logged on, but logging off lessens your security risks.

Frog thoughtREADER INVITE:  There are thousands upon thousands of individual apps usable with Dropbox. I’m specifically interested in the password protection apps. The ones that keep your file password protected after it’s uploaded to Dropbox. Let me know which one is your favorite and why.


Thanks for reading, have a great day and safe computing! 😀


DISCLAIMER: Any and all ideas presented in this blog are solely my own unless otherwise noted. I experience troubles with technology just like any other person, and if I stumble upon a fix or suggestion I feel could benefit others I pass it along. At no time, have I suggested or implied that I hold any degrees or certificates related to computer repair.

I have during my career assembled parts into working computers; done troubleshooting on hardware and software; utilized a great many computer programs and software; designed and updated websites and blogs; as well as created brochures, banners, and flyers.

Creating the Safest Passwords

What happens when uber-smart guys with no direction get bored? They build programs, viruses or bugs to hack computer databases. Yeah, I know what you’re thinking—that’s not so uber-smart. Well, there is a difference between intelligence and common sense, but that’s another blog topic.

When the media reports new cyber attacks on the general populace, I don’t get gray hairs over it. Why? Because I believe my passwords are relatively safe. And, to be honest, relatively safe is as close as any of us can get.

Amazon, Ebay, and many other sites go the extra mile in ensuring user security by encrypting  your password on their end. They utilize programs that scramble login information daily. When you log into your account, your password is different today than it was yesterday to anyone hacking their databases. Super neat tool, but the regular joe out there usually doesn’t have the knowledge or the skill level to accomplish this.

So what can you do? Today, I’m going to offer you suggestions I’ve gleaned over my internet years regarding creating safe passwords.  My tips and hints come from tech guys I personally know or from media sources that echo what my tech guys have told me.


Creating the Safest Passwords

First, what NOT to do.

1) Don’t use easily guessed passwords.Wordpress Login

The most commonly used — and easiest to guess — are 111111, aaaaaa, abc123, iloveyou, admin, and password.

You knew that already, didn’t you?

2) Don’t use the same password on everything.

I know what you’re thinking: “Patti, if i take your advice, I will never ever remember all my passwords”. I’ve added helpful tips at the end of this article to help with that.

Now, what to do.

1) Use random words, numbers and/or special characters.

A tech admin once told me a safe pass — and easiest to remember — is one made up of random words with a number inserted between. E.g. fight12puppies

2) Use an obscure password.

We can make our password even safer by changing some of the letters to numbers, and changing the case. E.g. F1gHt12pupp1Es

This is harder to remember, but go to the tips at the end of this blog for help.

3) Use a catch phrase.

By catch phrase I mean take a phrase and use the first letter in each word. E.g. We love our 12 puppies who fight.  The new password created is Wlo12pwf. This is a great password because I have difference letter cases (upper case W with the rest lower case) plus a number (12) in the new password.


Other Password Thoughts and Tips

fingerprint

There are fingerprint readers Microsoft says work with Windows. I haven’t tried them so I can’t recommend them, plus there are many monitors still out there that are not touchscreen. And as we all know: old technology is better than no technology …sometimes.

Rutgers University thinks the future of passwords is random squiggles and drawings on devices with touchscreens. Does anyone besides me see a huge downside to this? When you request a forgotten password, does the company/site send you a picture of your squiggles? What if you don’t squiggle exactly the same each time? Are you locked out?

  • Keeping your passwords straight.

Create a document on your computer that has all your passwords.

I know, I know. You’ve been told never to write down your passwords. Well, that just isn’t feasible in our new culture of online bill pay, online shopping, online social networking, et cetera, et cetera, et cetera. Especially when you’ve been told not to use the same password for everything, more accurately for anything.

Word tableI personally use MS Word. I inserted a table with four columns: 1) the URL/web address, 2) the email address used (I have several: business, personal, etc.), 3) my ID if different from my email address and 4) my password.

You can also use Excel, Wordpad, Notepad, whatever you have at your fingertips. A word of caution: don’t save this document to your desktop where anyone walking by while you’re getting coffee will be tempted to open it. Hide the document in a folder you can readily access on your hard drive.

  • Where to hide your super secret password file

If your file is saved to your personal computer, especially one used by several people, you could bury the password document under layers of folders. E.g. C:\user\computer\passwords.doc. But…it’s so much easier to save it to a flash drive. Flash drives are $5 on sale. Buy one!

If you do keep your password file on your main computer, don’t forget to copy and periodically update a backup on your flash drive, or eternal hard drive. This saves your file in the event of a computer crash, plus it’s easily portable.

Another word of caution. Always, always, always… log out of any account you use (email, bank, Facebook, etc.) on a public computer, no matter where it’s located. A coffeehouse or motel computer is used by thousands of people. You never know who could stumble across your information if you don’t log off.

  • What to do if a major retailer’s database is hacked?

 Not long ago Target’s credit card database files were hacked. I wasn’t all that worried as my password wasn’t in jeopardy. I just watched my credit card statements more closely. You can dispute charges within a reasonable amount of time, usually 30-45 days. This goes for your bank account also. Keep tabs on those.

And only a few weeks ago Ebay was hit and information stolen, including their encrypted passwords. Ebay programmed their site to force shoppers to change their passwords when they logged on, which I think is a sensible response. No financial or personal information was threatened, but a good move on their part regardless.

I personally try to use Paypal for as many transactions as possible online. Why? Because my credit card number isn’t scattered around the worldwide web at one hundred retailers, it’s saved at one…Paypal.


I hope this post helps secure your day-to-day networking lives. Using the internet can be challenging, but it’s very rewarding and does simplify our lives bringing so much information to our fingertips.

Well, I’m off. I need to backup my password file to my flash drive. 😀


DISCLAIMER: Any and all ideas presented in this blog are solely my own unless otherwise noted. I experience troubles with technology just like any other person, and if I stumble upon a fix or suggestion I feel could benefit others I pass it along. At no time, have I suggested or implied that I hold any degrees or certificates related to computer repair.

I have during my career assembled parts into working computers; done troubleshooting on hardware and software; utilized a great many computer programs and software; designed and updated websites and blogs; as well as created brochures, banners, and flyers.

Setting Up an Effective Blog

I am a novice blogger with common sense. Meaning I’m less dangerous than a pit viper, but more dangerous than a kitten.

So, take this information for what it’s worth—most likely free.

How to Set Up an Effective Blog

1.) Brainstorm a unique name for your blog BEFORE you set it up.

An A-list blog name will help people remember you and give your blog a professional look.  Some people use their names (these are usually authors or people who want name recognition), some use their blog title (I do), and some do neither.


My experience: My blog started as a one-time blog to publish a solution for a computer typewriter 60percent sizeprogramming problem many of us were experiencing, but no one was detailing a fix.  My blog received thousands of hits in a short time. I like writing so I wanted to expand my blog, but I also wanted a more professional URL.

At this point, I had two options: 1) start over or 2) set up a new blog URL and figure out how to export my posts and comments. I chose the second. The think tank of me, myself and I voted on a new — and as yet unused — blog name, set up the URL matching that name then exported my blog posts and pages to my new site. WordPress made it relatively painless with their helpful instructions, but It is MUCH easier if you decide on a name beforehand.


2). Create your URL on the blogger site you wish to use.

Ask your friends which sites they like and why, and/or you can search the pros and cons of blog hosting websites. I’d do both.

3).  Know the Save Draft and Preview buttons.

Find, become familiar with, and use these. draft buttonThe Save Draft button is your best friend, while the Preview button is everyone else’s best friend. Preview allows you — and only you — to review your raw post before publication without forcing the general populace to do the same. Using Preview only, you can make a test blog in perpetual draft format to play with in your blog editing program.

4). Insert relevant photos to break up the verbiage and make your blog more interesting.

I use my own photographs/clips, those in the public domain, or usable with permission. I never knowingly infringe on the copyrights of others. My philosophy: “Do unto others as you would have them do unto you”.

5). Use meta tags effectively for each new blog post.tags

Meta tags are important if you want people to find your blog using a search engine. I include my blog name in my search tags.

6.) Use links and auto post timesavers.

You can add links to your blog redirecting followers to your own or other people’s websites. You can also automatically notify followers of your new blog posts via other social media outlets (Facebook, Twitter, etc.). Some paid upgrades allow you to automatically repost your entire blog post to social media. Your blog help site should have How-to information.

7.) Post regularly.amish men crop

A regular blog can be posted daily, weekly, or monthly. It’s important to update yours periodically or your followers will forget you, or quite possibly think you’ve joined the Amish.

8.) Learn your blog program’s limitations.

If you have a formatting-perfection gene, you’ll need to resolve yourself to your blog program’s limitations… or you’ll need counseling.

Blog programs hyphenate in places there shouldn’t be hyphens, set photos less than exactly where you’d like them, etc. You can lessen your stress by learning a few html commands, but while your blog can be well-written and aesthetically pleasing, it will probably never be perfectly formatted.


Miscellaneous blog thoughts:

A blog is not a cash cow. Blogs are done for name recognition, to garner a following or to showcase a product for sale. No matter what anyone tells you, you can’t quit your day job because people visit your blog.

Attention Writers! If you’re an author, be aware some contests will allow previously blogged stories and some will not.

Take your time. It’s easy to update blogs, but easier on your followers if you take time to make certain everything you want to say is in a blog before you publish it. If you left out something, leave it out or if it’s super important, consider writing an entirely new blog on the subject rather than updating after publication. It’s less confusing for everyone this way.

Spelling, punctuation, and grammar errors can — and should — always be repaired and the old blog updated no matter when you notice them.

After you’ve become a seasoned blogger, you may want to take advantage of the perks paid upgrades offer. There are many things you can do (e.g. plug-ins) which paid sites allow that free sites do not. Sometimes for security reasons; most often to create a revenue stream. I have no problem with sites charging for upgrades— this keeps their free offerings free and their site in business.

Wishing You Happy and Effective Blogging! 😀


DISCLAIMER: Any and all ideas presented in this blog are solely my own unless otherwise noted. I experience troubles with technology just like any other person, and if I stumble upon a fix or suggestion I feel could benefit others I pass it along. At no time, have I suggested or implied that I hold any degrees or certificates related to computer repair.

I have during my career assembled parts into working computers; done troubleshooting on hardware and software; utilized a great many computer programs and software; designed and updated websites and blogs; as well as created brochures, banners, and flyers.

Windows 8: Administrator Accounts

If you are fairly computer literate like me—I know enough to be dangerous—at times you’ve found yourself wanting to move something, run something, delete something, and Windows tells you “You do not have permission to do this”. You think, “Huh? It says I’m an administrator.” So why then is Windows putting the kabosh on any changes you wish to make?

Here’s why you get that nasty, heartless message. There are two kinds of administator accounts in Windows.

Administrator User: an unelevated  administrative account created by default. This gives administrative rights to access your computer completely and make certain changes. As an Administrative User you are allowed to “Run as Adminstrator” any elevated program or make changes that affect every user.

Built-In Administrator: a hidden elevated  administrative account with unrestricted access rights and permissions.

See the difference?
Administrator User allows you to mess with your computer a bit.
Built-In Administrator lets you mess up your computer completely beyond recognition.

Insert appropriate warning here to back up computer files before making any changes.


OTHER USEFUL WARNINGS: 1) Always leave at least one account set as an Administrator User or you’ll be locked out of making changes to your computer, and if that happens you are on your own :-p 2) If you enable Build-in administrator, create a password to protect it.


Today, we’re talking about Built-In Administrator for Windows 8 specifically.

A lot of changes can be made with your regular “unelevated” Administrator account, but if you find that you just can’t by-pass Windows security to make changes, you’ll need to enable the super secret, not-to-be-named “Built-In Administrator” account.

Some things to know about the Built-In Administrator account: 1) Its folder won’t show up until after it is first used, 2) Apps cannot be downloaded with the Built-In Administrator, 3) This account should only be used to make program/folder changes and NOT as a regular user account, 4) Because of number 3, log off of the Built-in Administrator as soon as you are done using it.

There are several ways to activate the Built-In Administrator, I’ll show you the easiest way because the rest are really only for tech support guys who like to mess around and have too much time on their hands.  (#.#)

How to Activate Built-In Administrator:

1) Owindows-keypen your command prompt by holding down the Windows key  and pressing “X”.


This opens in the bottom left-hand corner:

Windows+X

2) Click Command Prompt (Admin)

3) Type in:  net user administrator /active:yes

After you enter, you’ll have this.

command prompt-admin

NOTE: There are cautions around the web forums to disable Built-In Administrator when you are done using it. If you log off each time, I’m not sure that’s necessary. It’s your call. TO DISABLE: use the same command line, but change the ‘yes’ to ‘no’.

4) Now you can log off and see your new Built-In Admin account.

What? You don’t know how to log off Windows 8. Neither did I so chill, it’s easy.

side commands


A) Hover over the top or bottom right corner of your screen until you see this handy menu. B) Click “Start” in the middle. C) Click on your picture in the top right corner, and Voila! You are in control of Windows 8 once more. D) Click Sign Out.

Windows 8 will force the shut down of open programs—it’s nice and will ask if that’s okay first, but you have very little time to decide so don’t lolly-gag.


You should now see this screen after a few minutes (if you get the Pre-screen—not the technical term for it—just click on it to be rid of it).

Admin logon

There’s your Built-In Administrator on the left. 5) Click on it and enter.

The first time you, enter you’ll get mini-Windows 8 tour complete with elevator music (I’m teasing about the music. Honestly, I don’t know…I had my sound muted.)

Now you are free to mess up your computer at will!

In all seriousness, be careful what you do on this account as things done in error can adversely affect how your computer works and even IF it works.

side commands


To add a password to protect your new super secret Built-In Administrator account: A) Hover over the top or bottom right corner. On your handy dandy side menu, B) click Settings at the very bottom.


Setttings


C) Click Change PC Settings at the bottom of Settings.


Now D) click Users and E) Change/Add your Passwordchange password

IMPORTANT TIP: If you’re like me and tend to forget passwords or write them down wrong/forget to update them in your Word.doc table, there is a very useful tool you should utilize. While logged into your Built-In Administrator acccount under Control Panel (Windows key + X) > User Accounts > click Built-In Administrator > in the left margin “Create password reset disk”. A flashdrive is all you need.

Good luck, and thanks for following Patti’s Pathways.:-D


DISCLAIMER: Any and all ideas presented in this blog are solely my own unless otherwise noted. I experience troubles with technology just like any other person, and if I stumble upon a fix or suggestion I feel could benefit others I pass it along. At no time, have I suggested or implied that I hold any degrees or certificates related to computer repair.

I have during my career assembled parts into working computers; done troubleshooting on hardware and software; utilized a great many computer programs and software; designed and updated websites and blogs; as well as created brochures, banners, and flyers.